Eduard Bf 110 E 1/72
The summer of 2012 brought one great product from Eduard—a brand new Bf-110 in 1/72 scale. It is great to see that they are growing their 1/72 kit line and I hope that more kits will be forthcoming in the near future.

The first kit delivered is the Bf 110E and the stock number is 7083. It comes in the usual ProfiPack edition and this includes many good elements alongside the standard injected parts. Inside the box is eight frets of injected parts (one being the transparent items), one sheet of quick-masks, excellent decal sheet and a sheet of photoetched parts, many of them painted. Also, of course, is the nice assembly instruction booklet.
The versions you can make directly from the box are for the E version, but the manufacturer has taken attention of future kit development by including several extra parts, such as the long fuselage and wheels which will not be used on this version. Decals are provided for five airplanes and cover machines used by Germany and Iraq.


Assembly goes smoothly regardless of the large number of parts included. This kit is good for even less skilled or experienced modelers. The whole interior can be built-up in one day and this is the most complex section to construct. The parts are all perfect in shape and fit together nicely. After assembly of the cockpit the next step is to mate it with the fuselage and ad a few other elements after that. During work on the cockpit you can also build up the wings and empennage and prepare them for mating with the fuselage later. After installing all the main elements the transparencies are next to be installed, and Eduard has included closed and open options. To make the masking easier, I suggest placing all the masks on the canopy parts first, and then install them on the fuselage. From my point of view this gives an easy way to mask the complex canopy framing.
There are many sensitive parts to be assembled in the final stages of assembly. There are the several counterweights under the wing, landing gear details, and radio equipment. The landing gears are of rather complex design but there are no problems in assembly. Simply take care of the angles and positions of the parts while assembling.
Parts which I recommend installing after the kit is finished are:
- A17—First place the wing cross and then apply this part on order to get better decal fitting.
- A13—The aerial mast should be installed after removing the canopy masks for best result.
- D2—The landing light cover on wing leading edge is best installed after all painting is completed.
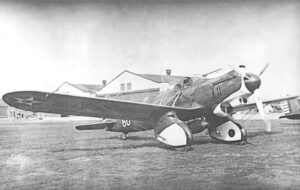
From the available paint schemes I chose to use the sample which is also shown on the box art, machine G9+JM, from 4./NJG 1. This is a very interesting scheme as it was in overall black with the topsides later overpainted in maritime green. I sprayed the entire kit black and after drying I placed all the main decals. I mention “main” because it is my guess that most (if not all) stencils on the top surfaces were covered with the green paint. On one archive photo it is seen that paint was applied around the main markings.


This is really a pleasant kit to build and best of all is that Eduard has announced new versions of kits to be delivered to the marketplace. This is for sure great news for all those who love this airplane. The sample shown here can be ordered at this link.
Srecko Bradic
Sample kit provided by Eduard