Strafer
You can not imagine how book “Catch 22” is amazing. Apart from amazing story, main flying role took B-25. I was and still em, impressed with this airplane. But it did not come from this book, and later movie, it start much before. That was book, old one, about the history of WW2 and B-25 was just mentioned there. Later I read amazing story of Col Doolittle attack on Japan, so with many other interesting facts, B-25 definitely took place in my heart. Strange to say that in more then forty years of my modeling activities, I did not get it. Yes, in past I get one but soon forward to another plastic modeler. Somehow, it does not fit me. Then, many years ago comes Hasegawa and its incarnation in Eduard package. Yes- kit for me.

So I get my sample. Eduard team was kind as always with this parcel. package top of the market, kit in nice box, cover art is attractive, inside plastic treasure! For me and no doubt it can be for you. Well… it is 1/72 scale kit, many European modelers like to say “in real scale”. Kit have stock number 7012 and this mean when you come on Eduard site, at top of site in search box type this number and you easy get it. Also work in Google, Yandex, Yahoo, just say “Eduard 7012” and this is it. You get upon this strafer. Well, it was great idea of the time, this variant B-25J was changed, no more transparent nose but solid one, full with destructive package of 12.7 mm Browning machine guns intended to make hell on ground among enemy infantry. And it did it with success, bomb cargo was still there, so J model was so effective ground attack platform. This kit is this one, just in smaller size. Six fret in total have grey parts for the kits and one is for transparent parts. There is cockpit as well gunner turret cover. But few more add from Eduard, like two etched set, one with painted elements, then mask, two here, one for transparent parts and another for the painting elements on kit. Great idea!! Yes, there is excellent instruction booklet and perfectly printed decals.


… assembly goes incredibly easy. Few more parts must be hand brushed after main paints are done and build can progress. And progress is more and less fast. No matter of many etched parts there, it does not slow down build, it goes fine, thanks to the fact that parts are so precise, fit nice and same things can be told for the etched parts designed by Eduard. Action there goes on few areas, cockpit, bomb bay, defence portions. Note- depends from version you built, some version will need to drill some holes inside, primary for external side mount gun pack. Also there is built assemblies, Eduard determinate it for easy work, I refer to the cockpit and nose gear, J is wing central section with bomb bay, K is rear gun section. So it look like war in few fronts in same time but it is not mind blowing, actually it goes nice and smooth. In first period, main load is on interior and it ends with fuselage half’s closing.
Well, you survive this interior assembly part, and more or less, rest goes far more easy. I can agree with Eduard that nice continue will be make main landing gear with tires. Good thing is they can be made separately, easy to attach at very end and this allow full array and options to make work easy. By assembly booklet, you can put completed landing gear in engine nacelle but it does not have to be the case, do it at very end. As you note, next is dedicated to engine nacelle, it is simple and precise made, just two parts and then set it on wings. Wings are also easy just top and bottom parts, nothing inside, no hole to drill, just remove from sprue, cement it and this is it. When edge are sanded and smoothed add finished nacelle and that section is completed. Follow to this is engine assembly. They are simply made, the same engine is of four part, entire in stainless steel color, only gear box is grey. And when its over just push it inside engine cover. It have to do some blisters. Points where need to fix those blisters are clearly noted. And this part of work is done more easy than can be imagined. It is also provided info of propeller assembly but no need, just make propeller complete and attach it at very end. This all belong to external work and part of this is nose assembly. Nose is just plastic part G3 and two parts with machine guns. Easy.


Painting
Do you know why I like Eduard Weekend edition? No need to think much about markings. In standard version, Eduard provide so much options that you get totally confused what to do!!! Take a look Monthy Pythoon sketch “how to confuse cat” and you will understand. Some kits I did not start just because I don’t know how to complete it and not enough space for kits to do all what I would like to have. So, in Eduard kit you have even…. options what to do. How I make decision? Simple- many paint options have yellow paint on top surface and in moment of kit build I did not have yellow. That was case decision. Otherwise, I will still think what to do.
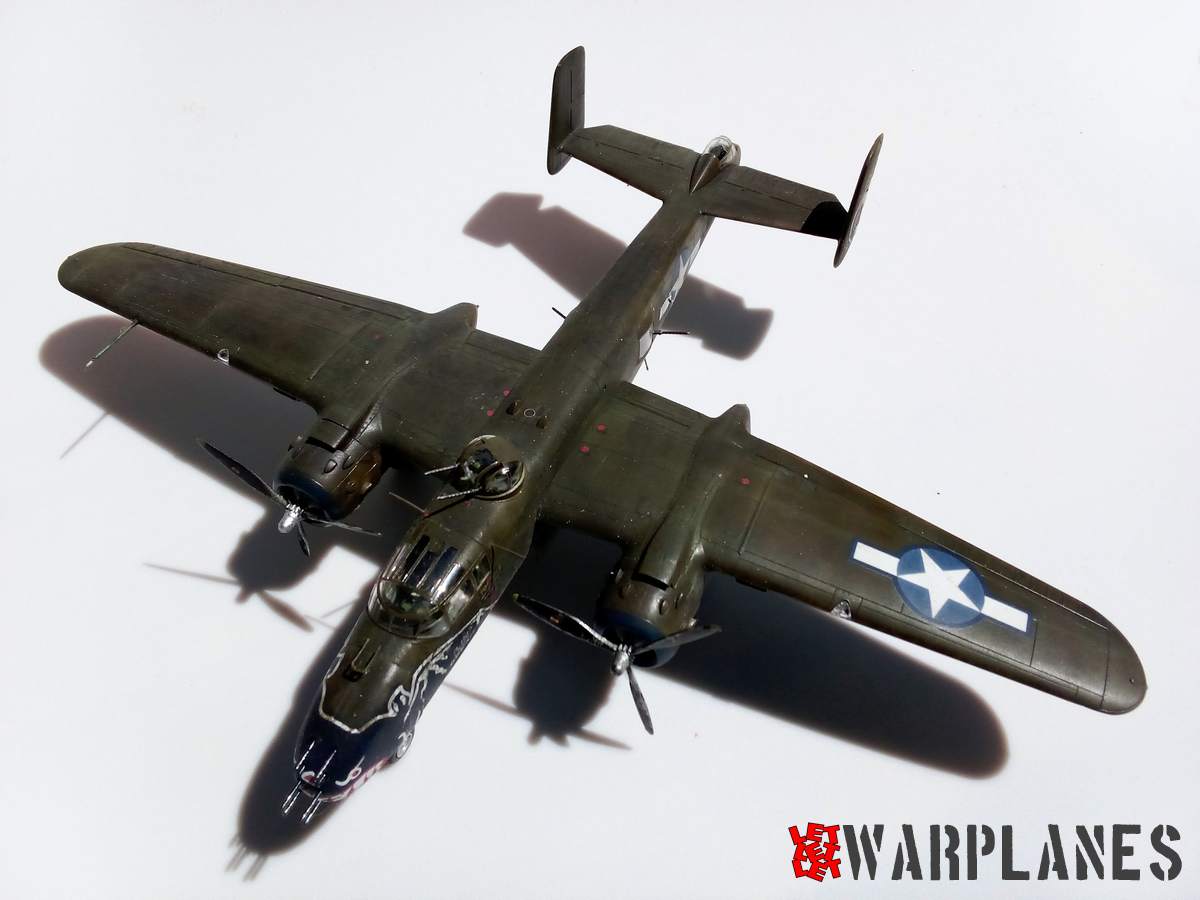
There is five options to do, all US operators. Paint schemes included are standard Olive Drab and Neutral Grey and also natural metal. All are fine, including so decorative and attractive unit markings. My choice is sample flown by 449th BS, Okinawa. It have nice bas on nose and Indian logo on verticals, with standard camouflage of Olive Drab and Neutral Grey. Painting did not have any problems as well mask did main protection job and some small assemblies elements comes at the end, in different color. For me the nicest moment was tp paint nose bat motive, with help of mask. No matter how this look complex at first glance, it is not. Gloss coat comes as perfect base for decals. There is not so much decals there, considering size of airplane (some smaller plane have much more of them) but in case of my sample, some need extra attention like the mouth motive which need to go over nose.
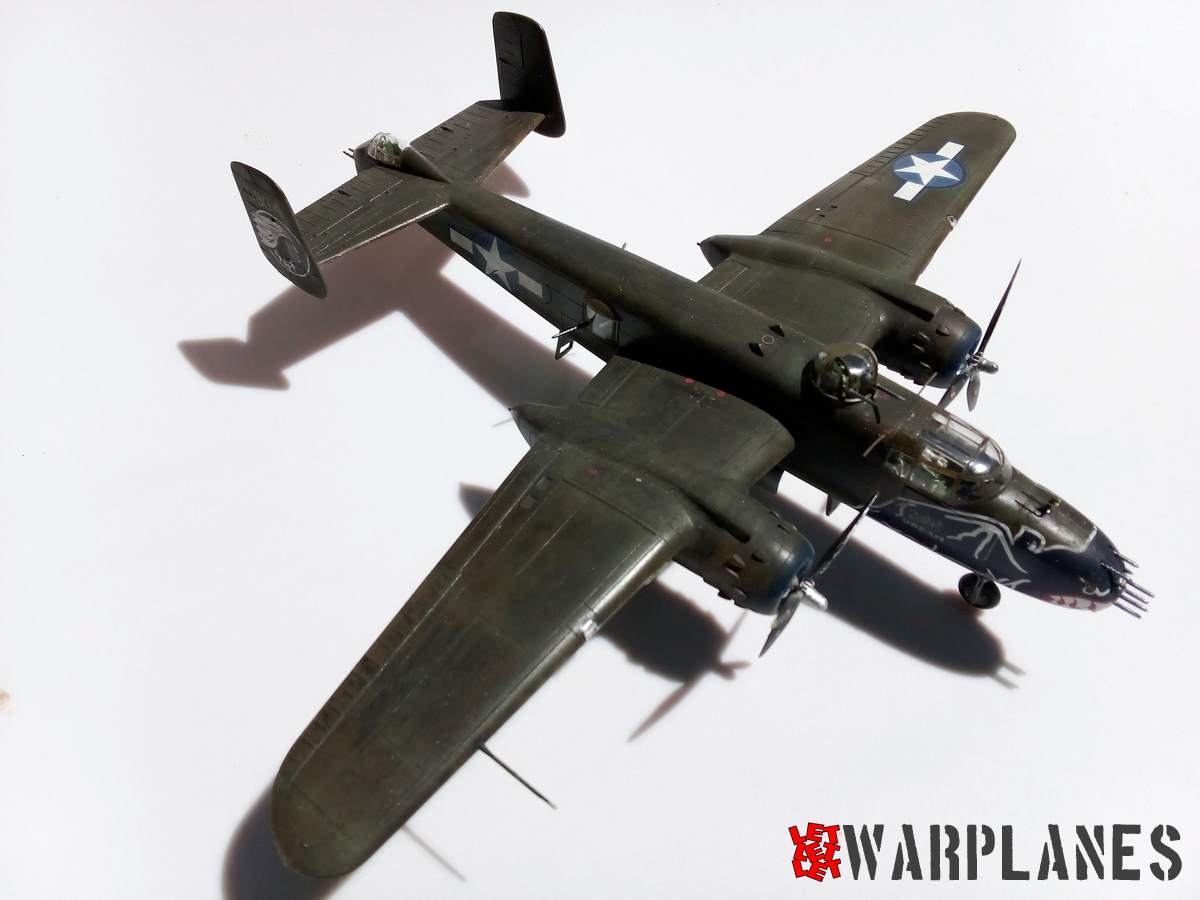
Final work include paint some small elements, like cover of rear gunner guns, placing small etched elements, landing gear and propellers. It look beautiful on desk once when finished!! Great choice from Eduard and even better delivery. Alongside with this kit, they offer much more products which can be used there and bring even more details and reality to the kit. Big thanks to the Eduard for this sample kit and you can find your sample here!
Srećko Bradić


