Valom P-75 Eagle
In the age where everything is submitted to be popular commercially, I really like all those who dare to do less commercial but very interesting projects. The product I have focused on here is the P-75A made by Valom from Czech Republic. Kit I built and review is not brand new release but upgraded with new tail elements and of course new box, assembly and decals.
The scale of this kit is 1/72 and kit stock number is 72010. It comes in nice box with really good art on the cover. This is a mixed media kit and you have inside two frets of grey plastic parts, one with transparent part (canopy), resin parts (landing gear box, wheels, spinner and exhaust pipes), small sheet with etched parts, transparent instrument panel… of course there is an assembly leaflet and color painting instructions as well as decals.
no images were found
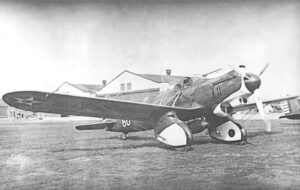
Before I go into the kit build explanation, I find it very important to clear up some important technical details. Decals are provided to be finished one of two machines, 432166 and 444550. But since these are prototypes, they differ in many details from each other. Images below show this difference and here you are explanation.
• Machine gun covers, 432166 did not have armament and etched part which present this panel show it with holes for shells. The kit, on the other hand, has no machine guns at leading edge as 444550 had them. Solution- if you want to built 432166 then just place etched parts in reverse side (it is flat) but if you want to do 44450, you need to made machine guns at leading edges and place metal parts as instructions demand.
• Both machines have aerial mast but placed in different position, one has it offset far on starboard, near markings and the other one have little offset to port, near vertical. This aerial mast is not given in the kit so you have to make it.
• On the wing root one has black lines and other one doesn’t
• The kit provides a pitot tube for 432166 which is on leading edge but do not for the 44450, which has it under the wing.
• Panel difference is obvious on image and for 432166 you need to make it.
• Most obvious difference is in the shape of the belly cooler; the kit has the shape suitable for the 444550 but for another one you need to upgrade it with plastic. Sample machine 444550 have also a flap and you have to make it (if you decide to make cooler version as from kit box)
no images were found
There are also other details needed to be changed on the kit and details are identical for both versions. You have on the gallery below and shows a cover on the wing which is not flat as on the kit and a small metal cover behind pilot seat. Kit also misses the actuators and one image shows how they look. Take a look at your spare decals box, there are some additional decals on propeller blades which are not provided in basic kit. And finally under the wing is small light, it is engraved on kit, you need to replace it with transparent part.
no images were found
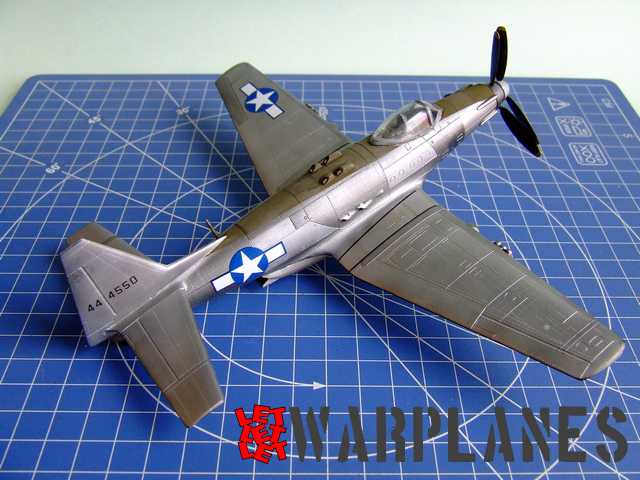
All right, let’s see how the build is going on. The kit presents a product of medium run quality and it needs a bit of sanding to fit perfectly. Nothing complicated, in general parts fit perfectly, and you just need a bit more care. Build starts with the cockpit and it has enough parts to look decent. I like the fact that the assembled cockpit can be inserted from the fuselage bottom hole (where wing is set later) and I did it in that way. I first assembled the cockpit interior and test-fit it inside the fuselage. After that I assembled the fuselage halves and inserted the cockpit inside. The wing consists of one large bottom surface and two top and they fit well into the fuselage hole. To regret I made a bit stronger pressure when I have held fuselage to wings and some join lines get into offset so I needed to use filler there. This is my fault, kits element fit perfectly. The rest of the parts also fit well to the kit, first I assembled the belly cooler, attached it and after that added the tail elements. After that I covered all join lines with a thin coat of diluted putty (I do that just in case) and sanded it when it completely dry.


Next step is a little scratch building and I used 0,5 mm plastic sheet for that purpose. First I drew cooler flap lines, cut it, bent and set into place. Second thing was the plate behind the seat, I made it with holes as on the original. After fitting into place I painted it and then installed the pilot seat. Since my sample will present 444550, I made holes in wing edges and cemented there small pearls used in jewelry production, a very easy and authentic solution. Last detail to fit is the cockpit canopy. I masked it first and then cemented it into position. To regret it has a gap under the windscreen so I had to fill it with plastic strip and filler. Last to add was landing gear.
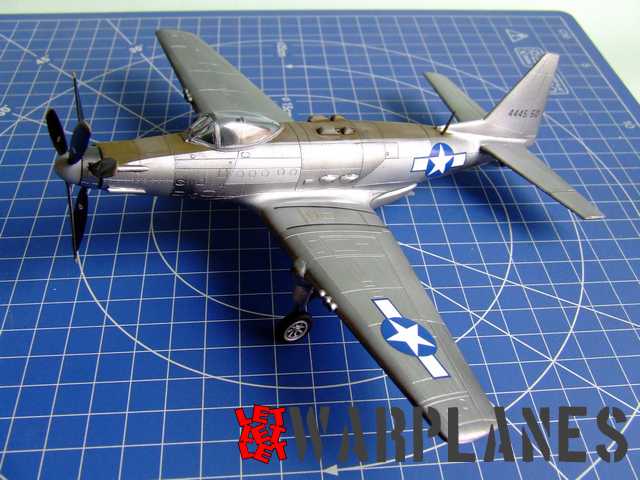
Painting is simple, entire airplane is in natural metal and for this I used black primer as base and then sprayed a few shades of Alclad. When Alclad painting was completed I painted the top surface in Olive Drab. Painting instruction suggest black color but my personal opinion is that this could be Olive Drab (it looks on one close up image lighter then insignia blue on fuselage…). Please consider this before painting this, both options look to be correct to apply.
There are not many decals on the kit. Please note that assembly instructions have a little error, they suggest to use larger national insignia on fuselage and smaller on wings and actually you have to place it vice versa.

Excellent kit! Details of panels, access doors and rivets are excellent and correct. Obviously the manufacturer did a great research job before it released this kit. Note that there are variations among the samples of this airplane and many of images are not available; this is why I have explained details in the beginning of this article. This kit is not for the beginner and needs a modeler with experience. Completed kit is great and for me very valuable sample in every collection. For more history of this plane please download this file.
Great thanks goes to Valom who provide me this amazing kit for review. Special thanks to Hobbycentrum for sponsoring this built with the set of excellent Alclad metallic paints. You can order your sample kit here!
Srecko Bradic


Great article and a nice looking kit indeed. Such a pity though that the US national insignia decals are wrong. The bars and outlines have incorrect proportions. Also the colour blue is a bit too bright. Hopefully it shouldn’t be too hard to source similar-diameter markings from another decal sheet.
Correct point, insignia blue are far more lighter then they have to be but this is markings, as you note, easy to replace with some from extra decal sheet, with better colors and proportions.