Eduard Polikarpov I-16 type 24 1/48 Weekend edition kit 8468
While working on the Polikarpov I-15 biplane, Nikolai Nikolaevich Polikarpov began designing an advanced, small, light and simple to build monoplane fighter. It featured cutting-edge innovations such as retractable landing gear and a fully enclosed cockpit, and was optimized for speed with a short stubby fuselage. On December 30th 1933 the first prototype rose into the air at the hands of Valerii Tchkalov. The fighter showed good speed for those times; it came to 303 km/h at the height of 1000 m. and 283 km/h at 5000 m. . I-16 was introduced in the mid 1930s and formed the backbone of the Soviet Air force at the beginning of WW II. By 1941, the I-16 was still the most numerous Soviet fighter and made up about two-thirds of the VVS. The Red Army pilots nicknamed the aircraft Ishak – Donkey. The I-16 performance was generally equal to that of the Messerschmitt Bf 109 (of the era) at altitudes up to the 3,000 m (9,843 ft), where the I-16 could fight the Messerschmitt Bf 109 E on equal terms in turns and had a more durable engine than the liquid-cooled engine of the Bf 109. The I-16 was slightly more maneuverable than the early Bf 109s, but the Bf 109 could use its advantages in slashing climbing and diving attacks to bring an I-16 down. Skilled pilots took advantage of its superior horizontal maneuverability and liked the aircraft enough to resist the switch to more modern fighters. About half of all produced I-16s were still in service in 1943, when they were finally replaced.
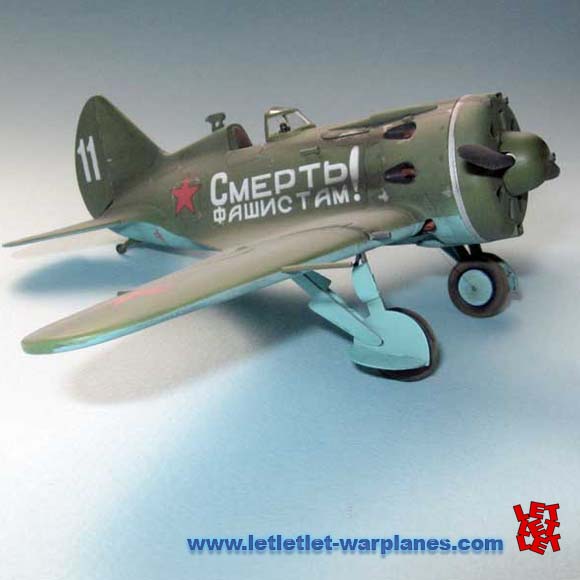
Boris Safonov was born to a peasant family on August 28th, 1915 in the village of Sinyavino. In 1933 he was drafted into the Red Army. Graduating from the 1st aviation school of military pilots in 1934, he was posted to the Byelorussian Military District. When the Great Patriotic War started, Safonov commanded a squadron of the 72nd Mixed Aviation Regiment belonging to Northern Fleet Air Force. The commander took it upon himself to personally participate in each and every squadron combat mission. At the beginning of hostilities the pilots of the 72nd were flying the already outclassed I-16s; Safonov completed 109 combat sorties and shot down 17 enemy planes while flying the I-16. On the sides of his plane Boris wrote “ZA STALINA!” (For Stalin!) and “SMERT’ FASHISTAM!” (Death to Fascists!). One of the planes Safonov flew is on display in Leningrad NAVY Museum. On May 30th, 1942 Boris Safonov flew his 224th combat mission – his last. The mission was to provide fighter cover for an Allied convoy heading for Murmansk. While in the air, three Soviet pilots spotted six enemy bombers approaching the convoy. The Soviet pilots attacked immediately. Safonov shot down 2 planes, damaged the 3rd but was himself killed. By May of 1942, he was the first Soviet ace to destroy over 30 enemy aircraft personally and in group. Many sources differ on the exact quantity of the destroyed planes; the number ranges from 25 to 41. Admiral Golovko, the Northern Fleet commander in the Great Patriotic War provides following numbers: 25 personal and 14 in group, he was highly decorated for his merits.
The newest addition to the I-16 family by Eduard is kit 8468 I-16 Type 24 1/48 scale weekend edition. The kit comes packed in a box with a beautiful profile of this fighter wearing most interesting markings for Soviet Ace Boris Safonov. The kit is actually a re-release of Eduard I-16 type 24 profi pack just as weekend edition so no photo etched parts and no masks can be found in this box. Kit is beautifully molded in traditional Eduard Olive plastic with some fantastic surface detail. The panels are a mixture of fine engraving and subtle raised panels. The representation of the fabric surfaces is superb – probably the best I’ve seen in a plastic kit, and the suggestion of the interior structure under the fabric is a real credit to the designers. Cockpit is well detailed with excellent detailed levers, I decided to add some small pieces of wire to reproduce electrical cabling. Cockpit floor is a bit inaccurate but I decided not to touch it because if you keep the cockpit doors closed almost nothing in the cockpit is visible, including the beautifully detailed instrument panel. Eduard has provided a decal for instrument panel and I gladly used it. Installing the pilot’s seat could be a little catchy but if you carefully follow the instructions you can’t miss it. I drilled two holes in front of cockpit one on each side of gunsight to represent a natural light openings, Eduard has engraved these openings as panels but they were actually two holes with glass on top. I glued the fuselage halves rather easy and almost no filler was needed but at the moment I supposed to glue fuselage and wings a problem occurred due to my decision to add engine and the cowling when I finish painting. I solved this quickly by adding a piece of rod from the sprue in the forward fuselage to spread the front slightly and improve the fitting. There are two injector pin marks inside of the fuselage halves and they are just the right spot to do this. At this moment I decided to add a small piece of sprue on top of engine cowling to represent an oil reservoir door. Engine is well detailed and it is a shame that once installed it could hardly be visible but I like to say I know it is there. I drilled gun barrels and venture tube and replaced pito tube with hypodermic needle. The undercarriage is precise and absolutely in scale. At the first moment I thought it could easily snap but when I joined them it is very compact and rather strong. Undercarriage doors are a bit complicate to install but if you follow the steps in the instruction sheet it is really easy and if I may say with all those rivets look realistic and effective. At the very end I added a piece of stretched sprue from the centre of wheel hub to the small hole at the roof of the undercarriage bay to reproduce gear retraction system.
no images were found
I sprayed a primer coat of Mr. Surfacer 1000 onto the aircraft and then filled in any remaining gaps and seam lines. After I have done some preshading using my Paasche Talon TG airbrush, and the I-16 was ready to be painted. I used Model master 1712 for top color and Revell 55 for bottom, both colors received some lightening in order to shade some areas and panels. After few coats of Klear I applied decals which are very thin and precise, and no decal solution was needed just one more layer of Klear. Next step was wash and weathering and at the end a final coat of mat coat.
This kit is easy to assemble and I really enjoyed building it, this is one of those kits you could really finish for a weekend. I-16 type 24 looks great on shelf so it is highly recommended for both novice and expert modelers!
Darko Mladenovic
Sample kit is provided by Jan Zdiarsky from Eduard


