Eduard Starfighter
The Starfighter is one of my most favorite airplanes and Eduard’s release was so welcome to me. Their kit is based on the Hasegawa kit with all possible updates from Eduard.
This kit is in 1/48 scale and it is released as a Limited Edition kit, stock code 1196 and label ‘NATO Fighters’. The reason for this name is the fact that NATO countries were provided in the decals and what you will be able to finish from this kit is following:
c/n 683C-4025, 331st Squadron, Royal Norwegian Air Force, Bodø Air Base, late 60s / early 70s
c/n 683D-7037, 192nd Filo, Turkish Air Force, Balikesir Air Base / Fairford, 1991
c/n 683-8331, Flown by Capt. Hans van der Werf, 312th Squadron RNLAF, Twente Enschede Airport, September 15, 1979
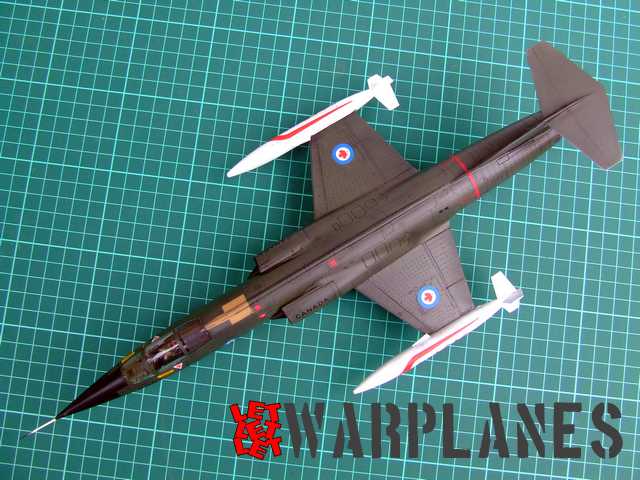
c/n 683A-1199, Royal Canadian Air Force, Twente Air Base, the Netherlands, May, 1976
c/n 683-9079, 350th Squadron, 1st Wing, Belgian Air Force
What you get in the box is extra precise Hasegawa plastic parts, assembly booklet, two decals sheets (for markings and labels and unit markings), resin parts for two types of ejection seat as well as small resin parts for external details and masks for transparent parts.
The build starts with the cockpit canopy and there start problems. In this very start, Eduard gives to assembly basic cockpit tub elements and sections like seat and instrument panels come later. And this ‘later’ makes a problem in the case of the instrument panel. Problem is that the instrument panel is much wider in bottom half then entry hole of the cockpit so you have two options to insert it inside. If you follow Eduard step, don’t place pilot stick inside in this step (part U4). The reason is that it will make problems when you try to place the instrument panel with top cover. Option is not to place it in first step but after you insert the instrument panel in a later step. The instrument panel can be inserted but put inside at an angle and then rotated and slid forward into position. After that you can place the pilot’s control stick. Second option is to place instrument panel in first steps and close it inside fuselage halves and you have to take great care with its position–you will need a few dry runs before final fix.


At the very start you also need to assemble and completely paint the engine and put it inside the fuselage. This will demand care later when applying camouflage to the airplane, to make protection of this element. The exhaust was very dark metal colors. Before fuselage halves assembly, there is need to open a few holes for later parts attachments. No matter I make few complains here, kit assembly is so smooth and the parts are very precise and this make modeling great pleasure.
On page four and five of the assembly booklet are provided the next steps and they include cockpit assembly (insert of instrument panel and other elements) as well as wing, tail section and air brake assembly. Here there are options, to make open cockpit canopy as well as to open the air brake. Since these sections include great details, it would be nice to open them but as I prefer the streamlined shape of the airplane, I decided to make it with closed canopy and air brake. The canopy is of excellent transparency so all details can be seen from outside.
The landing gear is a bit complex but absolutely not a problem to make it. The entire landing gear as well as the landing gear bay is in metal colors. Note that I built this from kit box so kit is ‘as is’ but you can add extra details on landing gear door since there are some installations (prepare copper wire and patience for this job). What I did not include is wheels; I painted them separately and left them for the very last assembly steps, after all of the paint job was completed. My choice was to make the Canadian sample machine so I chose the particular resin parts and cement these and also chose the correct exhaust for this version. I did not attach wing fuel tanks to the kit since they are of very different color so I attached them after the paint job was completed. The last part of assembly was to build the resin seat and place it inside canopy and closing of canopy with three parts transparent cockpit.


From all proposed samples I decided to make the Canadian sample. No specific reason why I chose this one, maybe overall green camouflage made it interesting, I don’t know. Anyway I painted it in camouflage green color and in the same turn I painted wing fuel tanks in white. Next to be painted is cream panels on top and bottom of fuselage and after that painting of black anti glare panel in front of windscreen as well as the radome. Note small difference in hue so I would like to suggest you to paint anti glare in black paint and radome in tire black, this will match the real look. There are some options in painting like sealant on cockpit. There are three options, sealant on canopy and rear transparent cover, only on rear cover and without cream sealant at all. I have no images of the particular plane so no idea what will be best solution. Other detail is nose probe, it is white and on many images of the real plane, it is shown with red spiral line, Eduard show it with plain white color.
No matter that I made some correction notes, this is an excellent kit for build, with very authentic final look. Eduard did a good job once again and this kit is more then recommended! Great thanks to Eduard for sample kit provided.
Srecko Bradic


