Author Topic: Me 262 V-3  (Read 37340 times)

Offline No.1

  • Administrator and Owner
  • Administrator
  • Hero Member
  • *****
  • Posts: 23092
  • Owner: www.letletlet-warplanes.com
    • View Profile
    • LetLetLet - Warplanes
Re: Me 262 V-3
« Reply #15 on: December 14, 2012, 07:17:44 PM »
:-ok

Offline Second Air Force

  • Moderator
  • Hero Member
  • *****
  • Posts: 5775
    • View Profile
Re: Me 262 V-3
« Reply #16 on: December 14, 2012, 08:38:11 PM »
Here is a photo of the beginnings of interior detail of the doors. I'm using both half-round Evergreen strip and different thicknesses of sheet styrene to achieve the stiffening structure.
http://i174.photobucket.com/albums/w117/2AF/IMG_1132_zps26ac7dd7.jpg
Me 262 V-3

Offline No.1

  • Administrator and Owner
  • Administrator
  • Hero Member
  • *****
  • Posts: 23092
  • Owner: www.letletlet-warplanes.com
    • View Profile
    • LetLetLet - Warplanes
Re: Me 262 V-3
« Reply #17 on: December 14, 2012, 08:44:57 PM »
:-ok Great!!!

Offline memitus

  • Beginner
  • *
  • Posts: 92
    • View Profile
Re: Me 262 V-3
« Reply #18 on: December 14, 2012, 10:24:15 PM »
Woow!! Very interesting the way you are doing this conversion, simply great!! I follow you!!
Cheers from México
"You get what you give"

Offline Sall

  • Sr. Member
  • ****
  • Posts: 4641
  • Build what YOU want,the way YOU want to,and above all-have fun!
    • View Profile
Re: Me 262 V-3
« Reply #19 on: December 15, 2012, 04:46:59 PM »
Great job mateee!! :-clap

Offline Ernie

  • Beginner
  • *
  • Posts: 371
    • View Profile
Re: Me 262 V-3
« Reply #20 on: December 16, 2012, 04:32:11 AM »
Very nice scratchbuilding / kitbashing again Scott, you are doing a great job!
Ernie

Offline Second Air Force

  • Moderator
  • Hero Member
  • *****
  • Posts: 5775
    • View Profile
Re: Me 262 V-3
« Reply #21 on: December 16, 2012, 05:39:13 AM »
Thanks, everyone. :-flo I intend to finish this conversion sooner than the two B 17 projects......... :-red

All of the flight control surface changes are now done on the wings. One last coat of primer to highlight the faults on engine nacelles, upper nose cover, wings, and the landing gear doors:
http://i174.photobucket.com/albums/w117/2AF/IMG_1133_zpsc38c12d7.jpg
Me 262 V-3


Then I located and made the cutout for the tailwheel. While researching this project I learned that the tailwheel and doors of the first four Me 262s were sourced from the Me 410.
http://i174.photobucket.com/albums/w117/2AF/IMG_1135_zps303a6277.jpg
Me 262 V-3

Offline No.1

  • Administrator and Owner
  • Administrator
  • Hero Member
  • *****
  • Posts: 23092
  • Owner: www.letletlet-warplanes.com
    • View Profile
    • LetLetLet - Warplanes
Re: Me 262 V-3
« Reply #22 on: December 16, 2012, 05:44:55 AM »
Shape in progress ;)

Offline draken35

  • Hero Member
  • *****
  • Posts: 8724
    • View Profile
Re: Me 262 V-3
« Reply #23 on: December 16, 2012, 12:02:45 PM »
Excellent!

Offline Sall

  • Sr. Member
  • ****
  • Posts: 4641
  • Build what YOU want,the way YOU want to,and above all-have fun!
    • View Profile
Re: Me 262 V-3
« Reply #24 on: December 16, 2012, 08:16:29 PM »
Great!! :-clap

Offline Second Air Force

  • Moderator
  • Hero Member
  • *****
  • Posts: 5775
    • View Profile
Re: Me 262 V-3
« Reply #25 on: December 17, 2012, 05:50:03 AM »
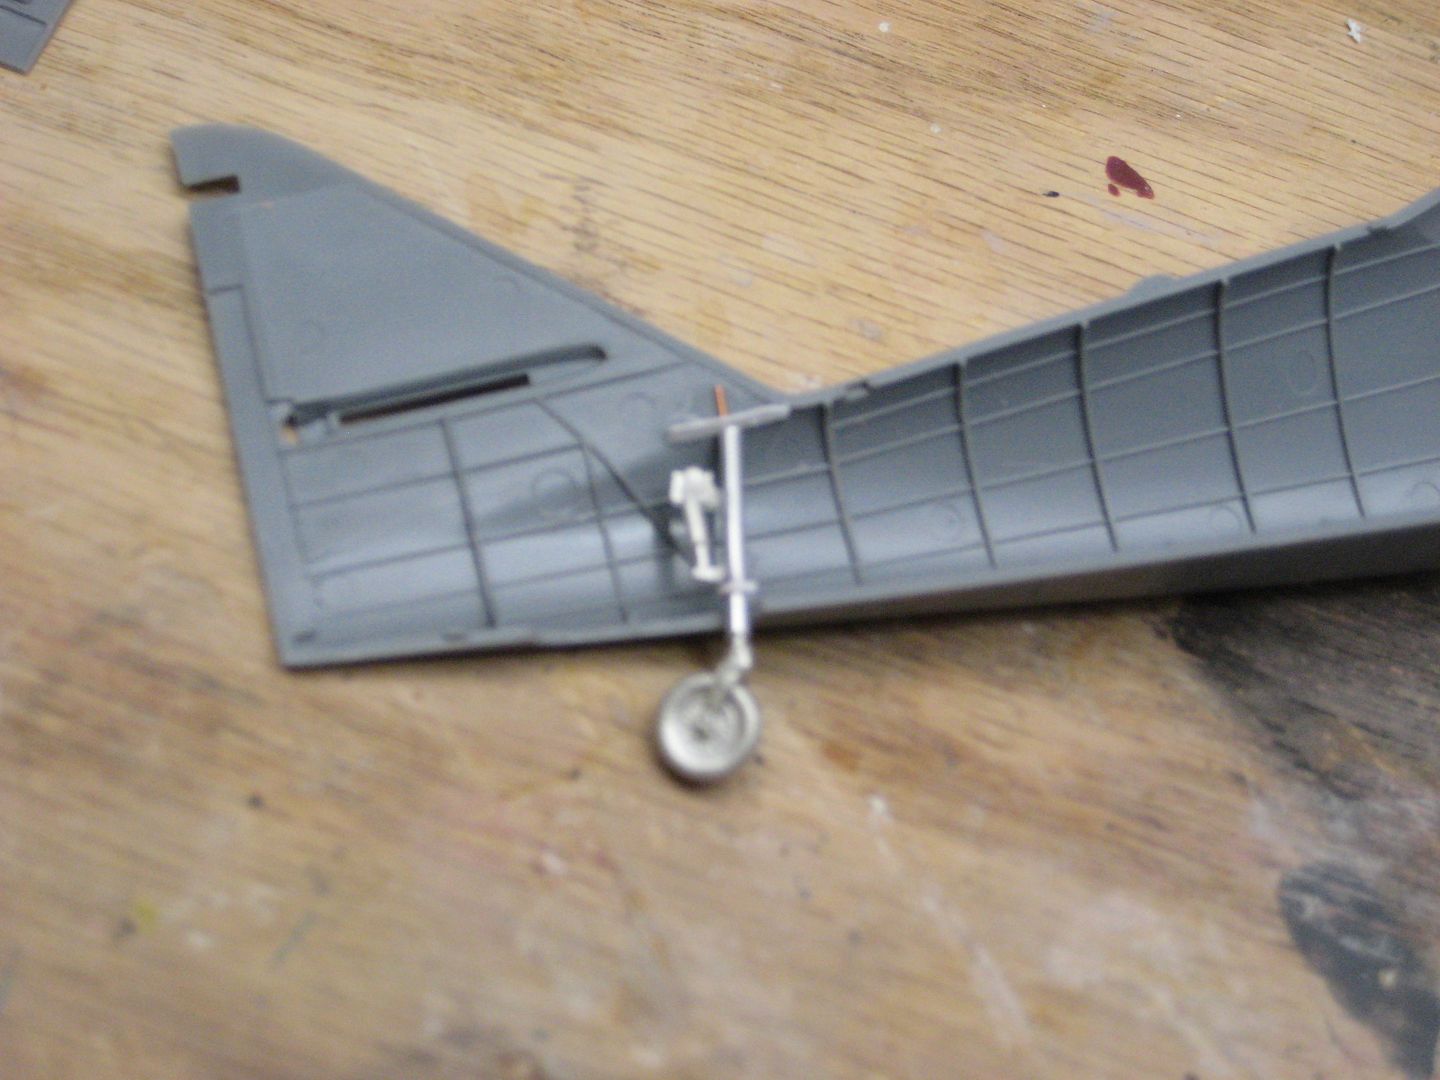
More work moving forward toward closing the fuselage halves, hopefully to occur this week. First off I fabricated the new tailwheel strut and retraction actuator. This was done with a bit of aluminum tubing and several pieces of Scale Aircraft Conversions white-metal landing gear parts. Also, take notice that Tamiya included internal structure all throughout the fuselage even to include the tailcone area:
http://i174.photobucket.com/albums/w117/2AF/IMG_1136_zpsc1036f98.jpg
Me 262 V-3


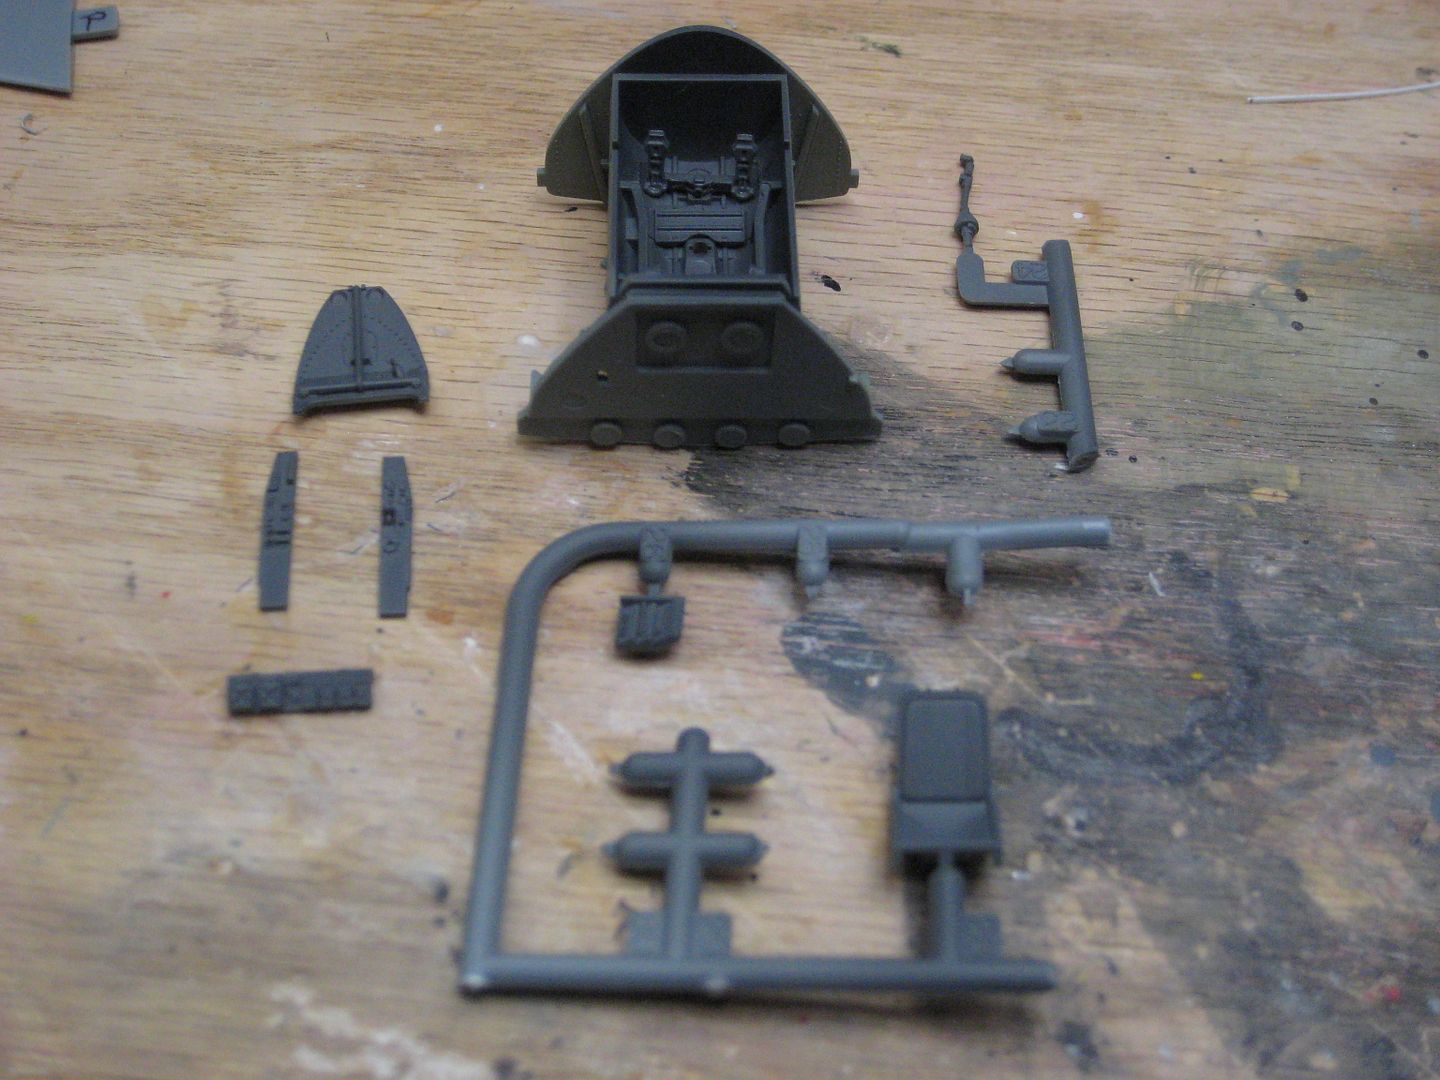
Next was to spray the interior of the cockpit tub and other parts RLM 66, followed by painting the interior of the entire fuselage and underside of the tub in RLM 02. Later 262s had bare aluminum in many of the internal areas but this prototype would surely have followed the early Luftwaffe painting orders:
http://i174.photobucket.com/albums/w117/2AF/IMG_1139_zps86cc9d03.jpg
Me 262 V-3

http://i174.photobucket.com/albums/w117/2AF/IMG_1140_zpsf79aec8d.jpg
Me 262 V-3


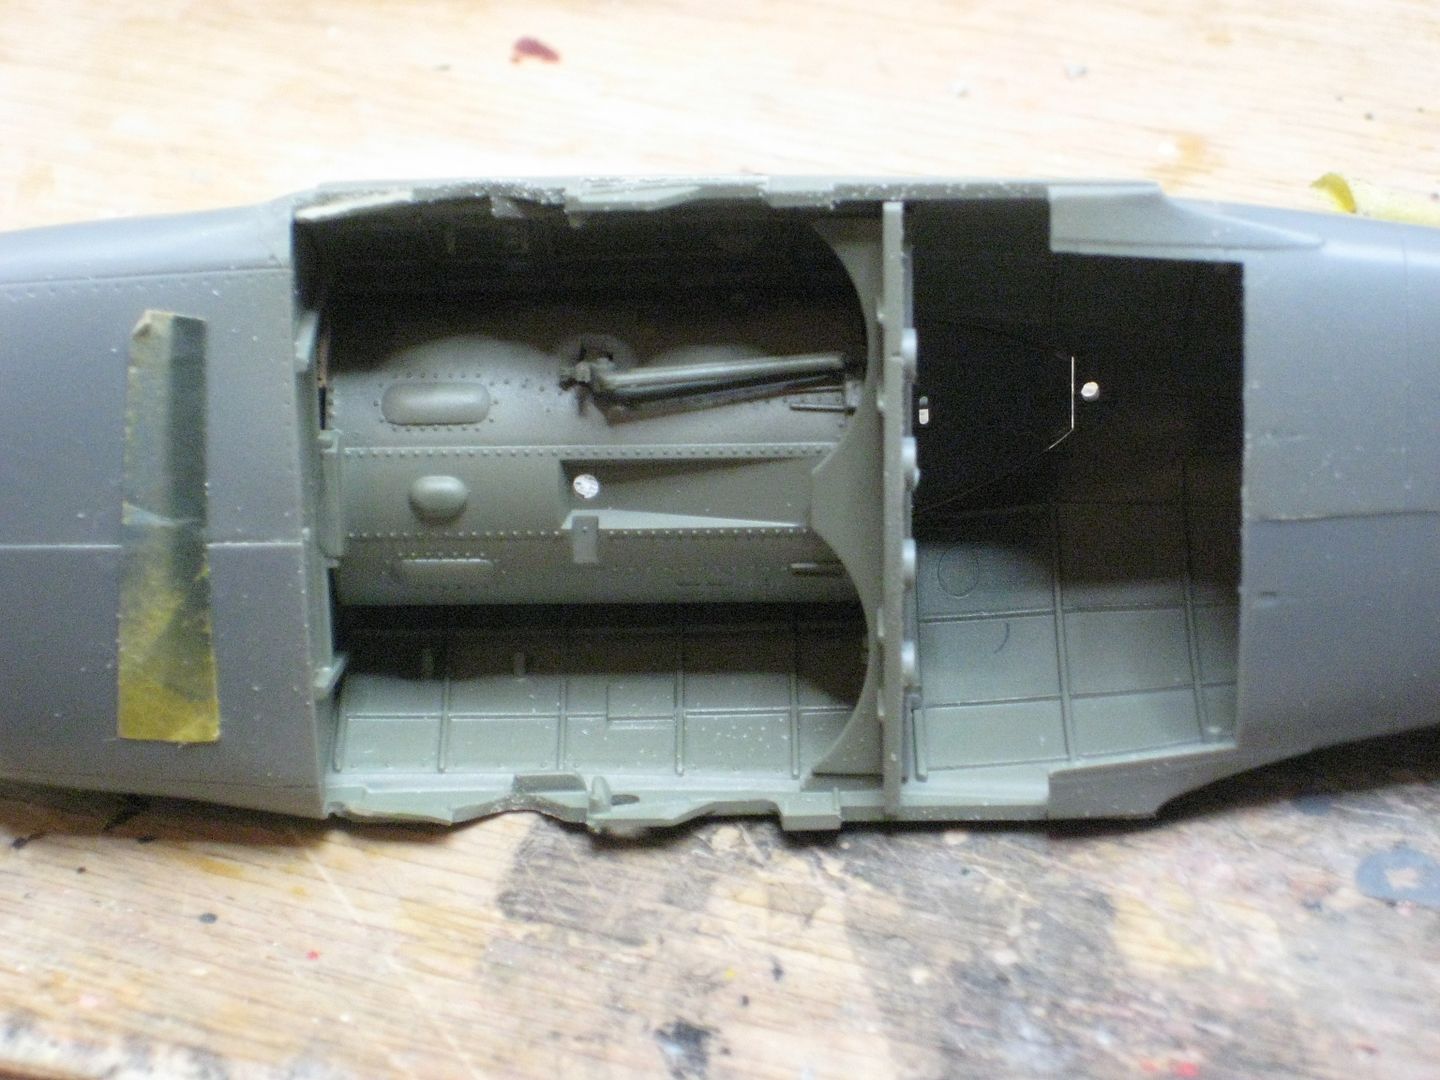
After the paint had dried sufficiently I began to close up the forward fuselage. First the cartridge ejection chutes were closed up in the two "cheek" panels, then these were attached. The last step here (until the fuselage halves are glued together) was to trim the nose gear doors a tiny bit and CA glue them in place. These fit pretty nicely and will need only a small amount of filler to make them disappear:
http://i174.photobucket.com/albums/w117/2AF/IMG_1141_zps9566b5d9.jpg
Me 262 V-3


Also, I broke down today and ordered an Eduard PE set for the instrument panel and seat harness :-ok, so the progress may slow until this arrives.

Offline No.1

  • Administrator and Owner
  • Administrator
  • Hero Member
  • *****
  • Posts: 23092
  • Owner: www.letletlet-warplanes.com
    • View Profile
    • LetLetLet - Warplanes
Re: Me 262 V-3
« Reply #26 on: December 17, 2012, 06:52:29 AM »
Eduard details will give additional power to build :-ok

Offline draken35

  • Hero Member
  • *****
  • Posts: 8724
    • View Profile
Re: Me 262 V-3
« Reply #27 on: December 17, 2012, 08:01:02 AM »
:-ok

Offline Sall

  • Sr. Member
  • ****
  • Posts: 4641
  • Build what YOU want,the way YOU want to,and above all-have fun!
    • View Profile
Re: Me 262 V-3
« Reply #28 on: December 17, 2012, 05:11:28 PM »
 :-ok :-clap

Offline Second Air Force

  • Moderator
  • Hero Member
  • *****
  • Posts: 5775
    • View Profile
Re: Me 262 V-3
« Reply #29 on: December 17, 2012, 08:37:32 PM »
Thanks y'all!

Yes, No.1, as this project started I was going to make my own seatbelts and use decals for instrument panel faces. The more I thought about the whole conversion I decided to call on Eduard for the panel and belts.

I've moved back to the engine nacelles, this time working on the exhaust sections. Firstly I decided to remove some material from each Zwiebel (inner cone) as my photos of the V3 show the cone retracted most of the way in all photos. To those who may not know, this cone moved into and out of the exhaust pipe to control the flow of exhaust gases. So, it was simple to saw off a bit of each Zwiebel and then install them to the turbine. The second photo is a "before and after" of how this works:
http://i174.photobucket.com/albums/w117/2AF/IMG_1145_zps261a5aa6.jpg
Me 262 V-3

http://i174.photobucket.com/albums/w117/2AF/IMG_1146_zpse962232f.jpg
Me 262 V-3