Show Posts

This section allows you to view all posts made by this member. Note that you can only see posts made in areas you currently have access to.


Topics - Second Air Force

Pages: 1 ... 5 6 [7] 8
91
Ground Forces / AFV Club Track Set
« on: January 29, 2012, 02:47:56 AM »
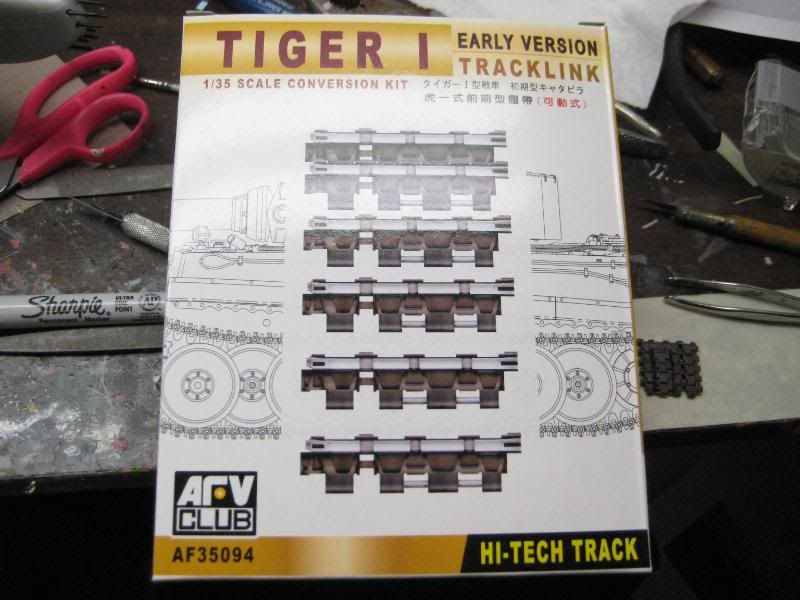
Today I had my first experience with AFV Club products when my Tiger I track set arrived. I have assembled a few links and thought I'd share this neat product with y'all.

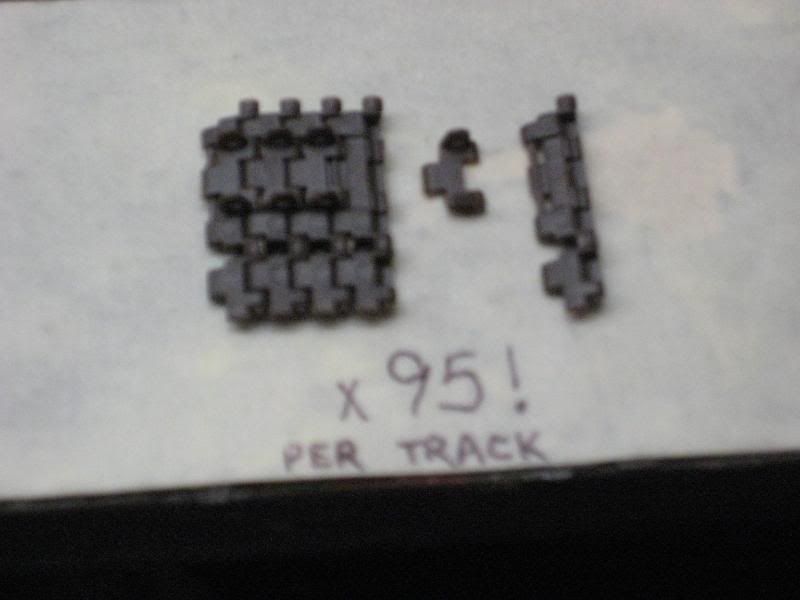
My Tamiya Tiger came with the old style flexible one-piece tracks. The kit tracks actually look pretty nice on the tread side but lack some detail on the wheel side, such as the guide pins not having the holes in them that the real ones have. The AFV kit assembles easily but will take a bit of time as there are 95 links per side to glue together! The track is nicely detailed and it is just as flexible as the real thing when properly assembled. Just a little bit of cleanup is needed on the knockout pin marks on the inside of the links but a couple of swipes with a sanding stick or file takes care of them easily. Here are a few poor-quality photos of the first five links that I put together.
http://i174.photobucket.com/albums/w117/2AF/IMG_9208.jpg


You simply mesh two links together and then glue the connecting pad/guide pin assembly into the recess made for it.
http://i174.photobucket.com/albums/w117/2AF/IMG_9205.jpg


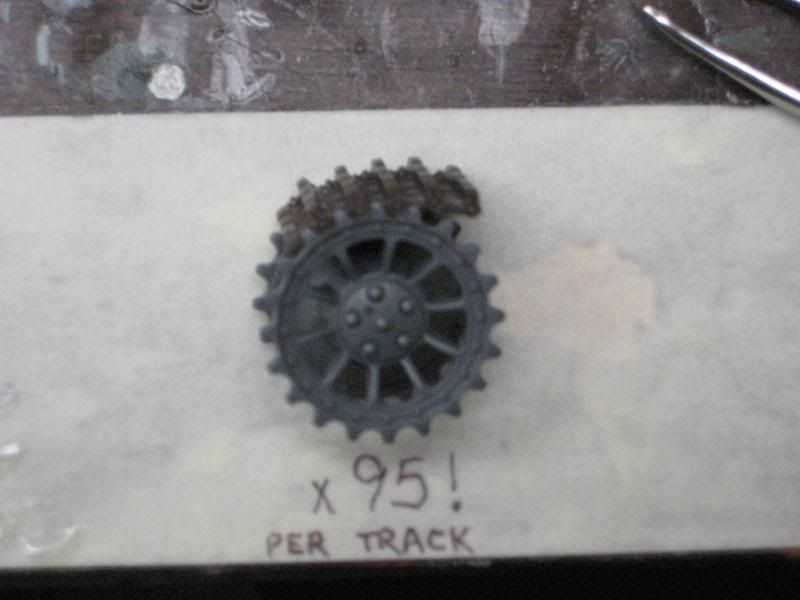
And the track meshes perfectly with the Tamiya drive sprocket. :-tri
http://i174.photobucket.com/albums/w117/2AF/IMG_9207.jpg


From reading other reviews I've gathered that the track also perfectly fits the Dragon and AFV Club SdKfz 181 kits. I can't wait to see the completed tracks installed on "Dad's Tiger"!


92
Aircraft Modeling / Fw-190D Eduard 1/48
« on: January 02, 2012, 01:50:29 AM »
With about an hour to spare in 2011 I finished my first Eduard Focke-Wulf 190, a Dora. I've been tinkering with this kit for several months off-and-on when other projects became tedious or boring. This is a beautifully molded model but it takes thought and patience to build it properly. I've learned a lot from this first one that will be very useful later. Since No.1 reviewed another of these Doras recently I won't go over a lot of old territory. Instead I'll just post up a few photos.
http://i174.photobucket.com/albums/w117/2AF/IMG_8899.jpg

http://i174.photobucket.com/albums/w117/2AF/IMG_8921.jpg

http://i174.photobucket.com/albums/w117/2AF/IMG_8956.jpg

http://i174.photobucket.com/albums/w117/2AF/IMG_8955.jpg

http://i174.photobucket.com/albums/w117/2AF/IMG_8950.jpg

http://i174.photobucket.com/albums/w117/2AF/IMG_8951.jpg

http://i174.photobucket.com/albums/w117/2AF/IMG_8953.jpg

http://i174.photobucket.com/albums/w117/2AF/IMG_8952.jpg

http://i174.photobucket.com/albums/w117/2AF/IMG_8954.jpg

http://i174.photobucket.com/albums/w117/2AF/IMG_8949.jpg


The model depicts W.Nr. 500666 of 3./1./JG 301. The only photos of this airplane are, sadly, of the wingless fuselage awaiting final destruction. The paint scheme is typical of the 500xxx W.Nr. group and ended up taking eight different colors including the Reichsverteidigung bands. Decals came from the Eduard kit sheet (excellent stencils, I must say!), my spares box, and a Trimaster D-11 that is still in the build-queue.

The only aftermarket parts on this kit were the landing gear legs. I used a set of Scale Aircraft Conversion white metal legs that I reviewed in an earlier edition of LLL Magazine. The kit landing gear is actually quite beautiful and it will go on another Fw-190 project. I also used stretched sprue for the lower mast whip antenna, landing gear indicator pins on the wings, and the radio antenna.
 

93
Aircraft Modeling / Eduard I-16 Type 10
« on: December 06, 2011, 04:28:32 AM »
A while back in the Japan Group Build we were talking about the Nomonhan/Khalkhin Gol battle and I built a Ki-27 that fought there. For a while I looked around for a Polikarpov kit to make the "matched set" of the two combatants. I finally found an Eduard I-16. This is really a beautiful little kit. Here are a few photos of the beginning of the build.
The first photo shows a few little modifications that were done. The kit has outlines for the landing gear windows and the round openings in the area under the windscreen. I simply opened these up along with the handholds for the pilot. Also I removed the floorboards on either side of the footrails as this area was open on the real airplane and eliminates some interference with sidewall details as well.
http://i174.photobucket.com/albums/w117/2AF/IMG_8745.jpg


The photoetch parts are quite nice and the instrument panel turns out beautifully. There is also a decal and substitute panel in the kit. I elected to build both, and when I saw how little of the panel is visible with the fuselage assembled I elected to use the plastic part, leaving the photoetched one for some later project. Here's the result. It would take a tiny dental mirror to see everything through that tiny opening:
http://i174.photobucket.com/albums/w117/2AF/IMG_8747.jpg

http://i174.photobucket.com/albums/w117/2AF/IMG_8751.jpg


And a few of general assembly steps.
http://i174.photobucket.com/albums/w117/2AF/IMG_8754.jpg

http://i174.photobucket.com/albums/w117/2AF/IMG_8748.jpg

http://i174.photobucket.com/albums/w117/2AF/IMG_8767.jpg


94
Combat Warplanes / 2AF Training Airfields Mini-Tour
« on: September 29, 2011, 12:16:05 AM »
We spent a number of days in our home state of Nebraska, primarily to attend the yearly McCook Army Air Field reunion/open house. There are, understandably, fewer and fewer WWII veterans attending but we still enjoy having the Memorial Service at the airfield that served as a training facility for B-24 and B-29 Bombardment Groups and Air Service Groups.

The first photo is of the flag placement ceremony at stones denoting each unit that either trained or was based at McCook during the War. Master Sergeant Hugo Lorenzen (Retired), who was stationed at McCook in 1945 as a B-29 electrician, is placing the flags. The second photo is our State Historical Marker that is located on the main street of the airfield.
http://i174.photobucket.com/albums/w117/2AF/IMG_8006.jpg

http://i174.photobucket.com/albums/w117/2AF/IMG_8029.jpg


Later I'll post some more photos of some of the Second Air Force fields that still dot the countryside in my home area.

95
Combat Warplanes / Pioneer Village, Minden Nebraska
« on: September 26, 2011, 02:44:50 AM »
Today we visited the small Midwestern town of Minden, Nebraska, the home of Pioneer Village. This is a very large collection of artifacts of Americana and also includes a few items of interest to warbird enthusiasts. The collection was built over thirty years by Harold Warp, the son of Norwegian immigrants to Nebraska. Mr. Warp developed "Flex-O-Glass" clear plastic in the 1920s and became very wealthy, spending much of the proceeds to build the Pioneer Village collection.

Here are just a few photos of some interesting artifacts.

The placard for this engine would lead one to believe it is a DB 605 but there are a number of casting marks that have a 601 on them. To the museum's credit the sign does mention that the engine is displayed upside down.
http://i174.photobucket.com/albums/w117/2AF/DB601001.jpg

http://i174.photobucket.com/albums/w117/2AF/DB601002.jpg

http://i174.photobucket.com/albums/w117/2AF/DB601003.jpg

http://i174.photobucket.com/albums/w117/2AF/DB601004.jpg


This one shocked me a bit.
http://i174.photobucket.com/albums/w117/2AF/WaltherHWK.jpg

http://i174.photobucket.com/albums/w117/2AF/WaltherHWK109-500.jpg

http://i174.photobucket.com/albums/w117/2AF/WaltherHWK001.jpg

http://i174.photobucket.com/albums/w117/2AF/WaltherHWKDataplate.jpg


I'll post a few more photos later--we're going to spend a good bit of tomorrow going through the rest of the facility.

96
Aircraft Modeling / Bf-109 Group Build-All Variants
« on: September 12, 2011, 07:05:03 PM »
We were visiting amongst ourselves on another thread and decided it might be nice to start a long-term Group Build for any and all versions of the Messerschmitt Bf-109 and offspring. All scales, all machines, all nationalities........this should be fun! :-jump As far as I am concerned we can work on this project at our leisure and we should keep it open for a   l o n g   time. I'm thinking it might be nice to make this a sticky topic in the future if we have enough response. Ideas?

Here are my four current/future projects, two restorations of Gustavs and the two Emils I recently purchased.
http://i174.photobucket.com/albums/w117/2AF/IMG_7906-1.jpg

http://i174.photobucket.com/albums/w117/2AF/IMG_7907-1.jpg


If we do this I'll learn something about the '109, like I do on every other LLL topic! :-salut

97
Aircraft Modeling / Revell Ju-87D-5
« on: September 04, 2011, 05:42:49 AM »
I had intended to finish this airplane in time to be inserted in LLL Magazine #5 to go with Nico's excellent Ju-87 article. I didn't even get close, so I'll just share the project here on the forum.

This is the old Monogram (now Revell) Stuka kit and is exactly as I remember it from many years ago. I picked this one up at a substantial discount a while back and decided I needed to build one again. Then I dove into the parts boxes and found what is left of my first one--both main landing gear assemblies and some parts of the canopy. I ended up using the tires from the original so as to have at least a bit of my thirty year old build incorporated into this one. It's not a heavily detailed kit, and it has the typical raised panel lines of that era, but it fits together nicely and looks the part.

Here's an in-progress view of the cockpit. About the only thing included in the kit is the floor, two seats (the gunner/radio operator seat is inaccurate) and the instrument panel. I used bits from the spares boxes and styrene for everything else. The radio is from a C-47 (I think) and the ammunition boxes are from a B-25 cut to fit. The machine gun mount is part of a landing gear from a 1/72 Do-17 I built with my mentor forty-five or more years ago. :-wise
http://i174.photobucket.com/albums/w117/2AF/IMG_7735.jpg


The walkways on the D I'm building have "anti-skid" strips on them so I used Evergreen strip for these.
http://i174.photobucket.com/albums/w117/2AF/002.jpg


A couple of other shots of it after painting the underside. I've got the canopy masked (finally) and installed so it'll be back in paint soon.
http://i174.photobucket.com/albums/w117/2AF/IMG_7770.jpg

http://i174.photobucket.com/albums/w117/2AF/003.jpg


98
Aircraft Modeling / Monogram B-25J--Completed
« on: August 09, 2011, 03:57:18 AM »
I've been sitting on this project for a while now (1981) and seeing the profiles No.1 has been doing in the Artwork forum inspired me to get a start on the kit.
http://i174.photobucket.com/albums/w117/2AF/IMG_7626.jpg


I originally wanted to do a gun-nose J but this kit came with the normal glass nose. I started to scratchbuild a solid nose from green putty and kit pieces but it didn't show much promise. That led me to stuff the whole thing back in the box and it's been there since. Recently I found a gun nose in the parts box from a model I broke up and it got me revitalized. Finally I purchased an Aeromaster 345th Bomb Group decal sheet last month so here is a quick first update.
http://i174.photobucket.com/albums/w117/2AF/IMG_7624.jpg


You can see the red gun nose on the left (I painted it the wrong color on my original model :-roll) and the green putty attempt on the right of the box.
http://i174.photobucket.com/albums/w117/2AF/IMG_7623.jpg


If any of you have built any of the 1/48 Mitchells you know how much weight it takes to keep the nose gear on the ground. A trick I figured out years ago is to seal the engine nacelles forward of the gear and fill the cavities with lead shot. This works well as it transfers some of the weight to the wings, right in front of the gear. There will still be a need for more weight in the nose, but it won't be so hard on the nose gear by distributing the lead this way. Here's one of the nacelles with the white bulkhead glued in place. Everything in front of the bulkhead all the way to the firewall will be filled with lead.
http://i174.photobucket.com/albums/w117/2AF/IMG_7376.jpg


This is a low-priority project but I'll update it when I can.
Scott

99
Aircraft Modeling / Airacobra Under New Management
« on: July 28, 2011, 07:06:04 AM »
Something a little different in my next salvage project. Yesterday I was digging in the spares boxes and kept finding parts of two old Monogram P-39s. Eventually I found enough pieces to build one from the two, so decided to restore the bits into a complete model. I'm not going to bore everyone with all the paint stripping--you've seen enough of that already. :-paper This will eventually become a P-39N that was handed on from the USAAF to another fighting force. (I'll let y'all guess at who used it after the AAF handed it over.)
http://i174.photobucket.com/albums/w117/2AF/IMG_7577.jpg

100
Aircraft Modeling / Ryan ST Series
« on: July 15, 2011, 08:09:38 PM »
As I was searching for other projects in storage I ran across this bedraggled Ryan PT-21/STM. I'll do another restoration project on this as time permits.
http://i174.photobucket.com/albums/w117/2AF/IMG_7529.jpg

http://i174.photobucket.com/albums/w117/2AF/IMG_7530.jpg

101
Aircraft Modeling / June Group Build--Curtiss Hawk 75
« on: June 02, 2011, 05:05:53 PM »
I reckon we should start a thread for the Curtiss GB even though there is still much activity on the other group projects. I have doubts that I'll be doing much to my Curtiss as I want to work on a different contribution to the next web-magazine.

As a kick-off to the GB, I will (eventually) be working on the 1/48 Hobbycraft P-36/Hawk that I've had for some time.
http://i174.photobucket.com/albums/w117/2AF/IMG_6893.jpg

I'll be building a Wright-powered version, but the kit cowling is not correct, being far too oval in shape. The original is nearly circular. I simply made a couple of relief cuts in the lip of the opening and reshaped the ring cowl to the correct form. The accessory section is also too oval. To fix this issue I cut the support from the rear of the part and reshaped it to match the new cowl.
http://i174.photobucket.com/albums/w117/2AF/IMG_7170.jpg

I'm giving some thought to making a mold of the reshaped parts, but it is nearly as easy to just reshape the kit pieces as it is to work with the resin copies. Time will tell.....
 

102
Aircraft Modeling / PZL P.11c LTD 1/48
« on: April 25, 2011, 07:35:34 AM »
This kit came from the "orphan" kit shelf at a local hobby shop this weekend. I picked it up for very little money so decided I could spend some extra time fixing the shortcomings of the kit that I'd read about on the web. It turns out that it isn't really all that bad for the more experienced modelers to tackle, though the Mirage P.11 looks a lot nicer.
http://i174.photobucket.com/albums/w117/2AF/IMG_6827.jpg

The decals are a bit waterstained but I think they'll be salvageable with some clearcoat.

The engine is pretty simple but the cowling is another matter. There is quite a bit of flash and some HUGE sprue attach points to trim. The exhaust inlets are obscured by two of the sprue tags and are pretty difficult to repair. The propeller and spinner are also marred by the sprue attachments. However, with some patient use of the files and sandpaper, all of these problems can be repaired. I intended to use a resin Wright 1820 to replace the kit engine, but so little of the engine is visible when the crankcase fairing is installed, that I'll use the LTD part.
http://i174.photobucket.com/albums/w117/2AF/IMG_6828.jpg

In just a couple of hours of "relaxation" I was able to roughly fit the engine and cowling parts for the first time. More needs to be done, but you can see that it does look like a Bristol Mercury with all that sheetmetal on it.
http://i174.photobucket.com/albums/w117/2AF/IMG_6834.jpg


The final hour or so was spent assembling the wing and taping the fuselage halves together. Here's a photo, I'll offer more information later.
http://i174.photobucket.com/albums/w117/2AF/IMG_6837.jpg


And thanks to LetLetLet for the nice photos of the beautiful museum airplane!

103
Aircraft Modeling / Curtiss-Wright CW-21B
« on: April 11, 2011, 05:29:49 PM »
I've mentioned in other threads that I purchased a large lot of models at an antique/junk store several years ago. This little jewel was one of the models in that group.
http://i174.photobucket.com/albums/w117/2AF/IMG_6711.jpg


Here are the contents--the former owner had started the model by painting the cockpit and assembling the wing. I am going to finish it as a kind of "team build" of sorts. I'll add one of my resin R-1820s to replace the kit engine but it'll be pretty simple otherwise.
http://i174.photobucket.com/albums/w117/2AF/IMG_6710.jpg


A request--do any of you have any other photos of the Dutch machines than the more common pictures on the web? I'd like to add markings that are just a little different but accurate.

Thanks in advance!
Scott

104
Aircraft Modeling / MISSING PARTS
« on: April 10, 2011, 05:50:52 PM »
Perhaps we should start a "missing parts" or "needed parts" thread for all our needs. I'm going to start this with a request of my own (of course).

I picked up an MPM SB-2, kit #72047, at an antique store and I am missing the top left wing half. It is item #3 in this photo, with the right half for reference.
http://i174.photobucket.com/albums/w117/2AF/IMG_6703.jpg

http://i174.photobucket.com/albums/w117/2AF/IMG_6705.jpg


If anyone has a spare or can steer me in the right direction to obtain one, I'd be in your debt. I suppose I can scratchbuild one, but the scribing and detail on the original is quite nice and I'd like to build the complete kit.

Thanks in advance,
Scott

105
Aircraft Modeling / April Group Build--F4U Corsair
« on: April 01, 2011, 07:57:24 PM »
It's time to begin the April group project, the Vought Corsair, of long service in several military forces.

I confess that I'm not doing a conventional kit build-up in my case, mainly because I've been using my modeling "allowance" on some Fairey projects. :-ok After discussing it on the Group Builds thread, I'll be restoring an old kit that I built in 1980. Here is the box art cover that mine came in, the Otaki/Arii kit of the seventies:
http://i174.photobucket.com/albums/w117/2AF/Otaki.jpg


Pages: 1 ... 5 6 [7] 8