Show Posts

This section allows you to view all posts made by this member. Note that you can only see posts made in areas you currently have access to.


Messages - Second Air Force

Pages: 1 ... 333 334 [335] 336
5011
Aircraft Modeling / Re: HOW TO: Natural Metal Finishes
« on: March 08, 2010, 05:31:36 PM »
See, I've already learned about a new product!  :-ok Keep the ideas coming, folks.

I apologize for not yet doing anything with this thread. I've been trying to figure out how not to bore everyone or tell y'all stuff that you already know all too well. :-blah :-blah :-blah

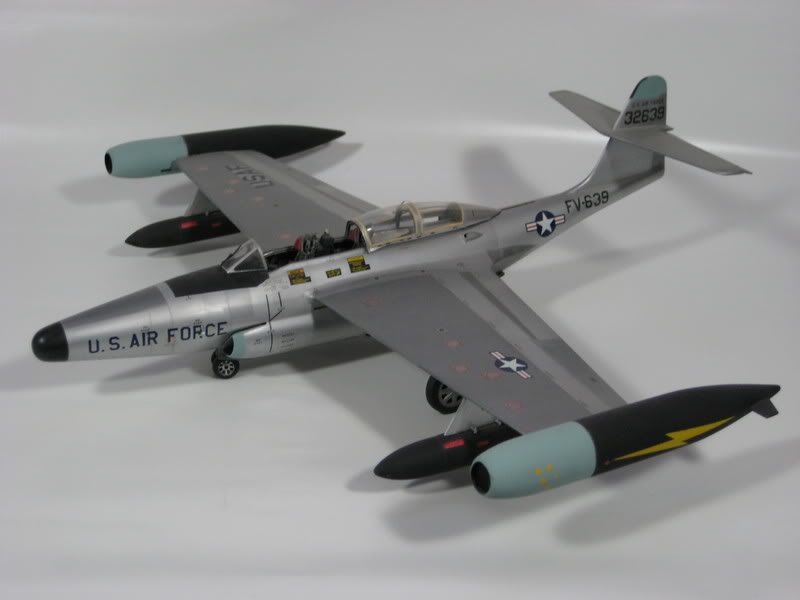
When I start a NMF project the first thing I have to do is plan. There are some kits out there that have so many flaws that the project would take years just to make the parts fit, much less to get a smooth enough finish for bare aluminum. The second consideration I make is the markings I want to replicate. My NMF methods require that I paint any anti-glare panels, radomes, deicer boots, etc. before the aluminum.

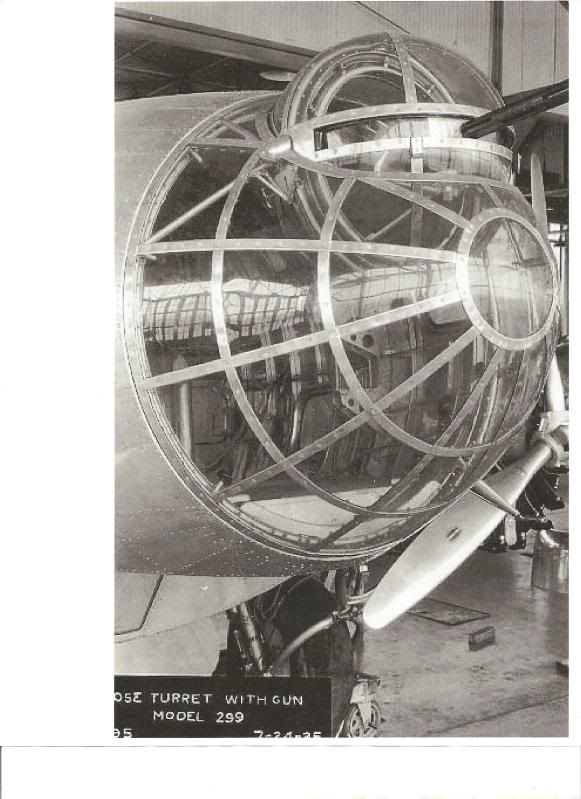
Once the planning and collecting of kit and other materials is done, the building process goes on as with any other kit with the exception of fixing ALL defects in the seams, panel lines, fit of turrets, canopies, etc. Quite often I've just sanded all the panel lines off (especially the raised kind) during the filling process and rescribed them lightly later.

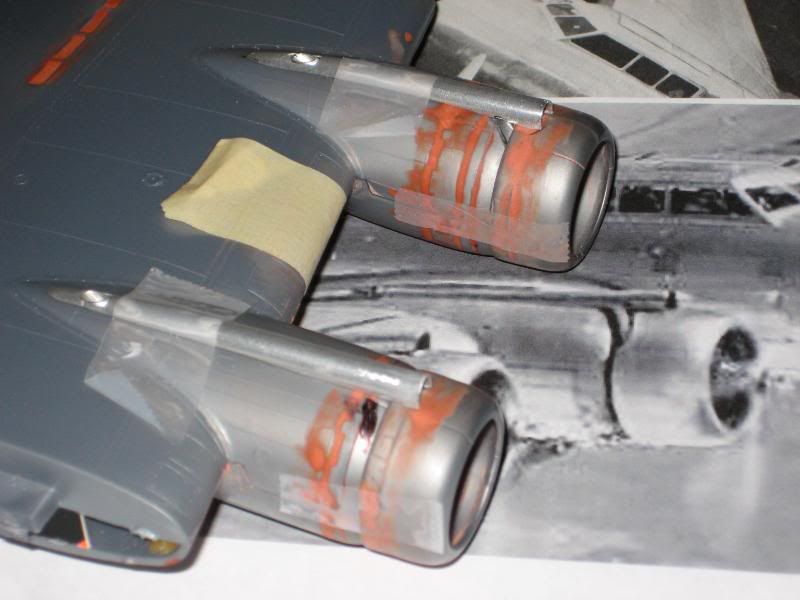
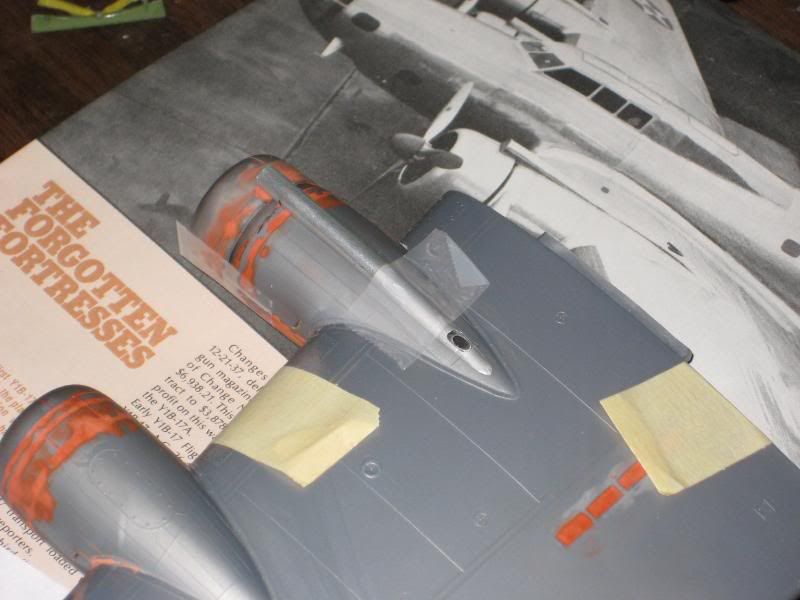
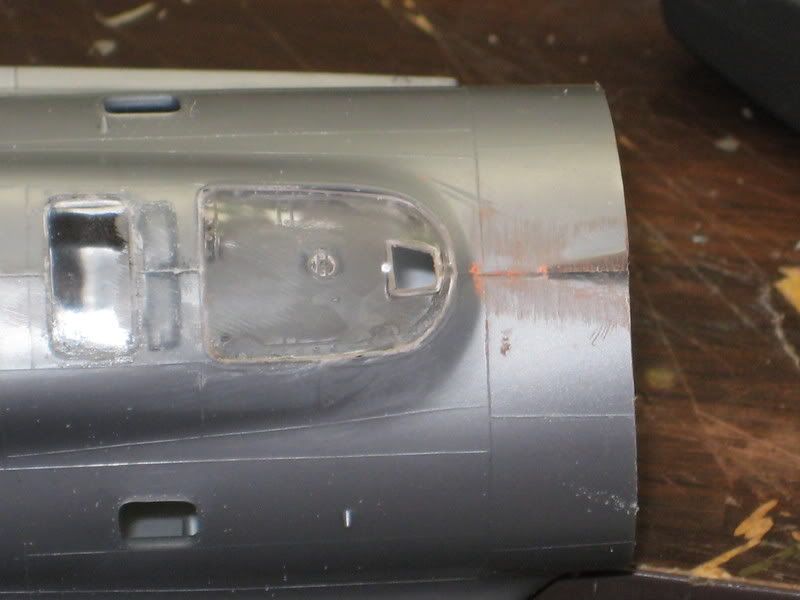
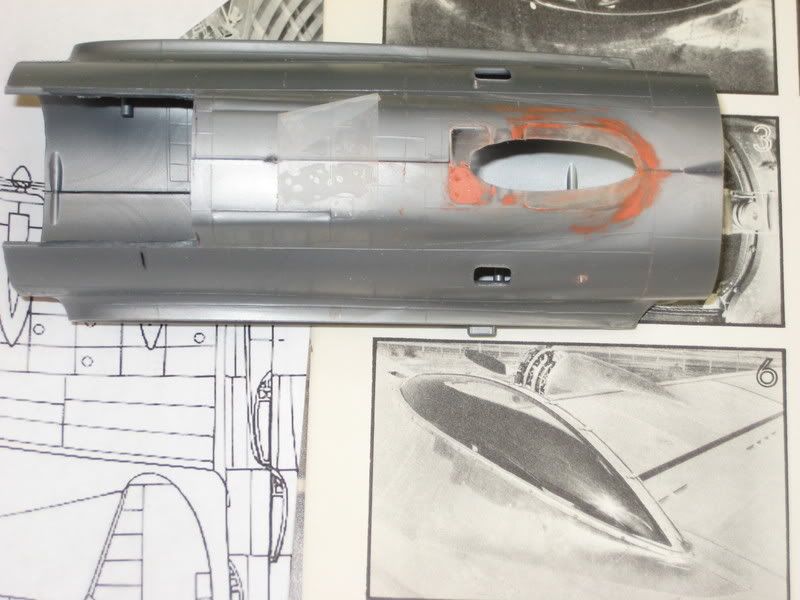
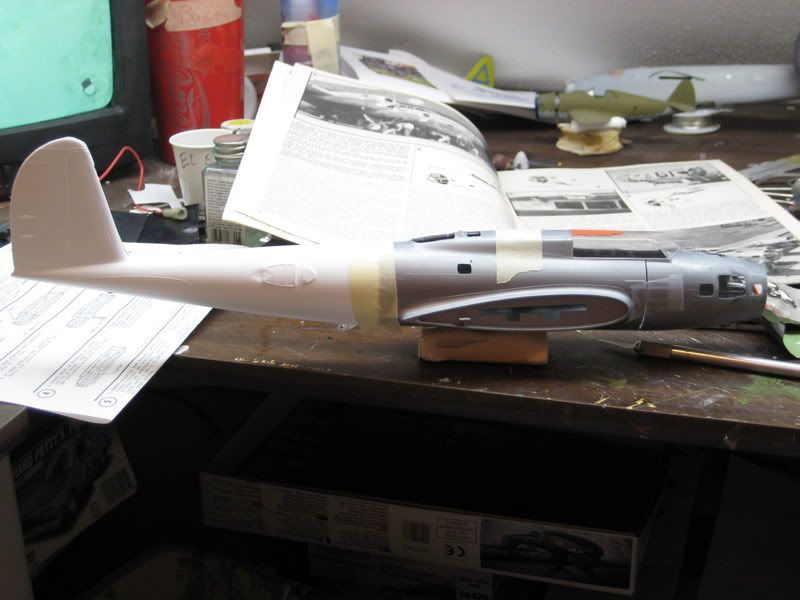
For studying the quality of all my surfaces, and especially the seams, I use a grey lacquer auto body primer, dusted on with the airbrush in very light coats so as not to attack the plastic. I then use the red oxide auto primer and dust on another light coat, just enough to make the surface red. I use this as a "guide coat" to wet sand with 600 grit or so. All the flaws will show through as either high (grey) or low (red) primer. Sometimes I can go back with more spray coats of primer and wet sanding to fill the flaws, sometimes it takes some spot filler to correct the problem. Once I'm fully satisfied with the entire surface of the model I can move on to the final stage, applying the paint and aluminum.

More later,
Scott

5012
Aircraft Modeling / Re: Boeing Y1B-17 Project--1/48th Scale
« on: March 08, 2010, 07:00:55 AM »
Another nacelle update. I had some free time again this evening to devote to the exhaust system so I built the fairing for #1.
One of the little details on the YBs was the exhaust stack that runs at an angle from the engine collector ring up into the exhaust fairing. You can see the #1 exhaust pipe is installed in this photo and the trough for the #2 installation is marked with black ink. The outboard engines used a different routing than the inboards for some reason, and all four angled exhaust stacks are on the right side of the engines. The inboard ring cowls are cut back to allow room for the exhaust while the outboards are not.
http://i174.photobucket.com/albums/w117/2AF/IMG_4649.jpg


And here's a close-up of #1 that shows the exhaust pipe more clearly, with a photo of a "real" #1 nacelle below the model.
http://i174.photobucket.com/albums/w117/2AF/IMG_4651.jpg


I'll have several more tall tales to tell about the nacelles that I must save for later.
Scott

5013
Aircraft Modeling / Re: Late war Bf109
« on: March 08, 2010, 02:22:54 AM »
For some time I will put on side this build until I solve the problem with the number '5'.

No.1,

Have you given thought to cutting your own "5" from sheet decal stock? I have done so on several models with good success. I simply copy the size and style of number I wish to duplicate on my copier. Then I carefully tape the printed figure (on plain paper) onto a piece of the correct color decal sheet and VERY carefully cut the shape onto the decal sheet with a new X-acto knife blade. The grey in your numeral would be cut from grey sheet in the same manner and applied over the white like a lamination. It is a bit tedious, but the results can be excellent with some practice.

Scott

5014
Aircraft Modeling / Re: Boeing Y1B-17 Project--1/48th Scale
« on: March 07, 2010, 04:54:14 PM »
Thanks for the support and interest in this project, everyone! My modeling works at a pretty slow pace due to a lack of time, but it gives me enthusiasm when I share the work with fellow modelers. Once we get the 1/1 scale B-17 flying I hope to have a bit more time to devote to this 1/48th version ;).

Scott

5015
Aircraft Modeling / Re: Boeing Y1B-17 Project--1/48th Scale
« on: March 07, 2010, 05:25:46 AM »
I had a few free minutes tonight and that gave me a chance to start on the intake/exhaust fairings that are a distinctive part of the Y1B-17 nacelle. On the real machine the intake for the carburetor is at the leading edge of the long fairing. Here is a really good photo from the Amarillo Mechanic School showing the intake duct and part of the exhaust system with the fairing removed:
http://i174.photobucket.com/albums/w117/2AF/AmarilloMock-upcowlinginstallation.jpg


The air that didn't go into the carb intake was ducted aft and appears to have acted as an augmenter, or at least as cooling air, for the exhaust. The collector ring exhaust pipe came up the right side of the nacelle, was routed into the long duct, and dumped at the end of the nacelle fairing. These two photos show the first fairing on #2 nacelle. I made the duct by splitting an aluminum tube lengthwise and shaping it as needed. To complete the installation I still need to build the intake duct and the collector ring exhaust pipe:
http://i174.photobucket.com/albums/w117/2AF/IMG_4642.jpg


http://i174.photobucket.com/albums/w117/2AF/IMG_4637.jpg


Scott

5016
Aircraft Modeling / Re: Boeing Y1B-17 Project--1/48th Scale
« on: March 07, 2010, 02:48:14 AM »

I decided to jump around a little to show some of the other parts I've been collecting for this project.

The YB was equipped with R-1820-33s, somewhat different appearing than the -97. After looking through some boxes I remembered that the SBD used much the same engine. In fact, the SBD-1 and 2 used a -32. I just happened to have one from an Accurate Miniatures SBD-1 that I was able to mold and cast in resin.
B-17 kit engine on the left, new -33 on the right:
http://i174.photobucket.com/albums/w117/2AF/IMG_2751.jpg


The propellers on the early Forts were the narrow-chord version, and the old AMT A-20 kit has the exact propeller needed. I also cast these in resin and put the resin props in the A-20 kits for later. Koster also makes a really nice narrow-chord Hamilton Standard that I have reserved for a PB4Y-2 planned for the future.
http://i174.photobucket.com/albums/w117/2AF/IMG_2743.jpg


And here is the engine cowled up with the new propeller on it next to the Monogram parts:
http://i174.photobucket.com/albums/w117/2AF/IMG_2750.jpg


Scott

5017
Aircraft Modeling / Re: Boeing Y1B-17 Project--1/48th Scale
« on: March 05, 2010, 08:42:48 PM »
Yes, it has very good adhesion. I decided to see if it is easily available but it seems that Testors may have quit carrying it.  :( I have also used Squadron Green Putty and it is quite good also but seems to dry out in the tube a little faster.

Scott

5018
Aircraft Modeling / Re: Boeing Y1B-17 Project--1/48th Scale
« on: March 05, 2010, 08:34:42 PM »
The filler you see on the bomber is Testors Model Master Red Putty. I like it as it dries relatively quickly (except if applied very thickly) and sands easily. The same basic product is also found in automobile body shop supply stores here in the U.S. and is often called "spot putty". The material is actually red oxide lacquer primer in a paste form. The only drawback to using this stuff is that the lacquer component in it tends to attack thin plastic sheet a bit.

I've had this tube for over ten years and it is still working well.

5019
Aircraft Modeling / Re: Boeing Y1B-17 Project--1/48th Scale
« on: March 05, 2010, 08:07:27 PM »
Here's another little installment on what I've done to the poor ol' model so far. I have jumped back and forth from one section of the plane to another during the building process and my updates aren't necessarily in that order.

The radio room is shaped quite differently on the sharkfin Forts due to the teardrop shape of the gunner's transparency. I glued the kit glass in place and filed off the little bit of dorsal fin and the wind deflector for the radio gun:
http://i174.photobucket.com/albums/w117/2AF/IMG_2965.jpg


After the glue had dried I did some filling and cut out the opening for the early bubble. After getting the opening shaped correctly I used my Dremel and files to reshape the turtledeck fairing--it is much narrower than big-tailed Fortresses and tapers to match the bubble:
http://i174.photobucket.com/albums/w117/2AF/IMG_2978.jpg


The photo reference that is under the fuselage in the second photo is actually of a B-17B, but the YB is the same shape with different framing on the bubble.

Scott


5020
Aircraft Modeling / HOW TO: Natural Metal Finishes
« on: March 05, 2010, 04:22:34 PM »
Since several of us have discussed NMF airplanes on Letipapa's Mystere IV A thread, we thought it would be nice to have a thread dedicated to ideas on how to make bare metal airplanes as realistic as we can. Everyone is invited to contribute all ideas as to preparation, materials, and methods that they use to get a proper finish for such airframes. Hopefully we can all learn from one another and increase the realism we all strive for.

I'll post this photo of a Falcon Vacuform F-89 that I built in the later 1980s as a starting point.
http://i174.photobucket.com/albums/w117/2AF/IMG_0625.jpg

I used Alclad and a product that I can no longer remember  :-/ for the finish on this model. The 1/1 airplane I replicated was a rather tired machine and the skin was no longer the bright, polished finish of a new bird, hence the finish I was trying to achieve. I'll post some techniques and a few other photos later, but other duties call!

Scott

5021
Warplane Art / Re: Boeing YB17
« on: March 04, 2010, 08:01:20 PM »
Thank you, No.1, I hadn't thought about doing a magazine submission. I will definitely take you up on the offer if I ever get the model done!!! Once we get the real B-17 flying and get through the airshow season I will probably have a bit more time to finish the YB project.

S

5022
Warplane Art / Re: Boeing YB17
« on: March 04, 2010, 07:54:54 PM »
I think when complete, or you could do an "in-progress" series.

Great stuff,
Scott

5023
Warplane Art / Re: Boeing YB17
« on: March 04, 2010, 07:00:05 PM »
Y'all need to post that one on the YB thread on WIX Modeling Hangar--maybe I will pick up the modeling pace now that you've given me some inspiration! :-cool

Thanks!
Scott

5024
Aircraft Modeling / Re: Boeing Y1B-17 Project--1/48th Scale
« on: March 02, 2010, 11:48:46 PM »
If your profile isn't too far along ;), this is the ship I'm modeling.
http://i174.photobucket.com/albums/w117/2AF/38thY1B-17.jpg

The cowls are yellow and black checkerboard, and I have a color profile of the Squadron emblem somewhere in the reference photos for the project. She was in the 38th Recon Squadron at the time this photo was taken. There is a color photo of her and a sister in flight in the group of pictures you posted earlier.

Scott

5025
Aircraft Modeling / Re: Boeing Y1B-17 Project--1/48th Scale
« on: March 02, 2010, 10:05:00 PM »
Well, the evil PC is working right now, so here is the nose photo of the prototype 299:
http://i174.photobucket.com/albums/w117/2AF/299Nose.jpg

The small ball pivots in the nose piece and the entire nose rotates. That might be one of the most challenging parts of the model to construct. I have a Mattel Vacuform machine so can experiment until I find the correct solution. Also, all four of the aft gun positions will be vacuformed but these should be a bit easier to fabricate.

Here is a photo of the first time I mated the two fuselage sections.
http://i174.photobucket.com/albums/w117/2AF/IMG_2688.jpg


S


Pages: 1 ... 333 334 [335] 336