Show Posts

This section allows you to view all posts made by this member. Note that you can only see posts made in areas you currently have access to.


Messages - Second Air Force

Pages: 1 ... 332 333 [334] 335 336
4996
Aircraft Modeling / Re: Boeing Y1B-17 Project--1/48th Scale
« on: March 18, 2010, 06:27:00 AM »
The bombardier station has been a question mark since I first contemplated doing this conversion. I decided to simply get out the grinder and start removing plastic. The first photo is what's left after I removed the chin turret fairing from the forward fuselage.
http://i174.photobucket.com/albums/w117/2AF/IMG_2953.jpg

The G fuselage really works pretty well to build the YB because the new bombardier sighting cutout goes exactly where the chin turret was.

This is the plug that I came up with. It still needs some adjusting before I glue it down, but you get the general idea of how it will look.
http://i174.photobucket.com/albums/w117/2AF/IMG_2955.jpg

Figuring out how to get the correct window size and shape by adjusting the two side fairings was more of a challenge than I thought it would be. :-think

Scott

4997
Aircraft Modeling / Re: Boeing Y1B-17 Project--1/48th Scale
« on: March 17, 2010, 06:03:15 PM »
I thought I would jump from the nacelles to the fuselage for a little update on that part of the model.

The forward fuselage of the "shark fin" Fortresses was 18" shorter than the E and later aircraft. The surgery was quite easy, just cutting the section out with the trusty razor saw. This photo is the first fit check of the shorter nose, using the propeller arc as an informal guide to the length I wanted. I used the prop arc and the aft rectangular window as reference points in order to confirm the dimensions were equivalent to the drawings I have.
http://i174.photobucket.com/albums/w117/2AF/IMG_2693.jpg


Here is a bit of progress on the window configuration of the YB. The Koster kit actually provides a clear section to fill the cheek window but I decided to use plastic sheet instead. All the other windows, of course, are located differently than the B-17B and later.
http://i174.photobucket.com/albums/w117/2AF/IMG_2714.jpg


Scott

4998
Aircraft Modeling / Re: HOW TO: Natural Metal Finishes
« on: March 17, 2010, 06:55:41 AM »

And the Fokker-100  :-love

I used to work on the full-sized version of that little fellow, in fact, on that actual tail number several times.

S

4999
Aircraft Modeling / Re: HOW TO: Natural Metal Finishes
« on: March 16, 2010, 06:13:35 PM »
Ok,

Here's how I apply Bare Metal foil. Sorry about the photo quality, and the foil I have is probably ten years old, so this is a poor representation of the process. As the foil ages on the backing paper it seems to become more fragile and tears easily when removing it. New sheets fresh from the hobby shop should give good results. I use "Chrome", not "Ultra Bright Chrome" because it is more representative of shiny alclad and conforms better. "Matte Aluminum" is good for alternating panel shades on relatively flat surfaces. I use Alclad or Testors Metalizer for various areas depending on shading, shape, etc.

First, and most important, is a perfect, glass smooth surface. Any seams, scratches, etc will really show up when the foil is smoothed out.
http://i174.photobucket.com/albums/w117/2AF/IMG_0635.jpg


Next, use a metal straight edge and a BRAND NEW X-acto blade to cut a panel to roughly the size you require:
http://i174.photobucket.com/albums/w117/2AF/IMG_0636.jpg


Now pick up a corner of the foil with the BRAND NEW blade and carefully peel it off the sheet:
[http://i174.photobucket.com/albums/w117/2AF/IMG_0637.jpg


Apply the foil to the area you want to cover, being very careful not to fold or kink the foil in the process:
[http://i174.photobucket.com/albums/w117/2AF/IMG_0638.jpg


Now smooth the foil carefully across the entire surface, and I use a fingernail to slowly insert the material into all panel lines:
http://i174.photobucket.com/albums/w117/2AF/IMG_0639.jpg


This step is a bit more difficult on vacuform models due to the panel lines on vacuform being less distinct than on injected kits. If you're careful, you can use a flexible ruler to wrap around the fuselage in order to maintain straight panel lines. I use the fresh blade to trim down the panel lines on the kit and remove the material not needed:
http://i174.photobucket.com/albums/w117/2AF/IMG_0640.jpg


Simply repeat this process to add panels across the airplane, being careful to smooth the foil with a soft cloth from time to time. In this example I used Chrome and Matte Aluminum to get the varying panel coloration:
http://i174.photobucket.com/albums/w117/2AF/IMG_0650.jpg


If you aren't satisfied with a particular area, you can carefully remove the foil with a fingernail or soft tool. Clean off all adhesive that may remain before putting on the next sheet:


There you have it, one guy's way to do NMF aircraft. Practice makes perfect as in any hobby, but I've had good luck with this system. Three things to remember: Absolutely smooth surface; BRAND NEW X-acto blades; and fresh Bare Metal foil.

Here is a Fokker 100 done with the BareMetal method:
http://i174.photobucket.com/albums/w117/2AF/IMG_0021.jpg


Scott

5000
Aircraft Modeling / Re: Boeing Y1B-17 Project--1/48th Scale
« on: March 15, 2010, 06:18:16 PM »
Letipapa, I had to construct that support structure from plastic rod and sheet. The YB and 299 had these tubes in the nacelle to support the engines and the outer skin fastens to the cage. The thicker piece at the top of this photo is the trough that the exhaust system sits in on the original airplane. All later Forts had a fully monocoque nacelle and eliminated the need for this support basket.
http://i174.photobucket.com/albums/w117/2AF/IMG_4535.jpg


That red piece is just a part of the plumbing that will be in the nacelle when it is complete. That is actually a piece of electrical wiring that happens to be the correct diameter for the tube I was replicating.

Scott

5001
Aircraft Modeling / Re: Boeing Y1B-17 Project--1/48th Scale
« on: March 15, 2010, 03:08:55 AM »
No.1,

I have a pretty accurate three view drawing of the YB but no actual dimensions or blueprint. I overlayed the YB overhead drawing with a B-17G outline and determined the dimensions that way. If it will help I'll get you the material I have.

While I'm here, a couple of photos of the main landing gear. The Y1B-17 used pneumatic brakes rather than the later hydraulic type. On the Monogram kit there is a small container molded to the gear leg. This is a "debooster" and varies the hydraulic pressure being applied to the brake. I removed the deboosters in order to have room for the small fairings that the YB's had on their gear legs. The retraction jackscrew and motor/gearbox are made from aluminum tubing and some spare B-29 main gear door actuators from the spares box.
http://i174.photobucket.com/albums/w117/2AF/IMG_4579.jpg


And a shot of the gear in the nacelle:
http://i174.photobucket.com/albums/w117/2AF/IMG_4581.jpg


Scott

5002
Warplane Art / Re: Italian P47 remake
« on: March 15, 2010, 03:04:39 AM »
Letipapa,

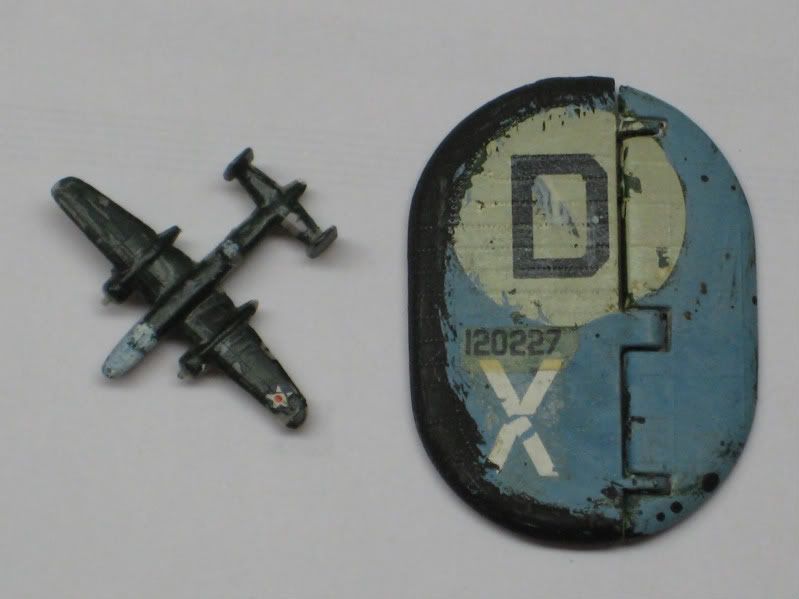
Here are two of my most treasured artifacts from my boxes of spares:
http://i174.photobucket.com/albums/w117/2AF/IMG_4105.jpg


The B-25 is from the Doolittle Raid Hornet aircraft carrier (the first ship model I built) and the vertical fin is from my first-ever aircraft kit, the old Revell B-24. Apparently I felt that I had to use ALL the decals on the sheet! :-eek I keep both of these parts at my modeling desk and have for many years. I still remember the fun I had building both of those kits and the satisfaction of completing them. I often look up at them and remember those times as a kid!

Sorry I hijacked this thread, Santynus-I often don't know when to stop talking!  :-blah :-blah :-blah

Scott

5003
Aircraft Modeling / Re: Boeing Y1B-17 Project--1/48th Scale
« on: March 14, 2010, 04:59:52 AM »
This change of the nacelles length -

I learned a valuable lesson on the engine nacelles. When I originally started planning to build this model many years ago I thought I had studied the dimensions quite thoroughly. I knew the fuselage was 18" shorter in front of the wing and that the back of the airplane was entirely different, but I thought the wing and nacelles were more-or-less the same as the later airplanes. Only after I started measuring a factory three-view drawing did I realize the differences in the nacelles. I am thankful that I didn't find this out after the wings were glued together or it would have been quite a problem. You can never have enough information on a conversion project!

Scott

5004
Warplane Art / Re: Italian P47 remake
« on: March 14, 2010, 04:10:56 AM »
"big box of remains" this sounds so good :-clap :-clap :-clap, that I now officially proclaim ( :-smey) that I am adopting the same name for a very small beginner's box of similar stuff. :) :-wave

 :) :) :) I have a box of decals and boxes of parts and pieces of kits I built as a kid. I've been building models since around 1965 so there is a pretty large amount of remains to dig through. The extra stuff certainly comes in handy, though!!!!

Scott

5005
Aircraft Modeling / Re: Boeing Y1B-17 Project--1/48th Scale
« on: March 12, 2010, 07:48:24 AM »
Next was the #2 and 3 nacelle interiors. The 299 and YBs used a totally different engine/nacelle support structure than all the later models. On the B and forward the nacelle is fully monocoque with the skin, stringers, and frames supporting the entire load. On the 299/YB there is a truss from the wing structure to the firewall that supports the engine mounts. Here are a couple of reference photos to show the truss. The bottom picture is the development of the Y1B-17A showing the early turbocharger mounting on top of the wing.
http://i174.photobucket.com/albums/w117/2AF/IMG_45311.jpg


Here are both nacelles with the trusses constructed. All the plumbing and other details will be installed just before the wing halves are glued together. The long white half-tube at the top of the nacelles is the trough that housed the exhaust system on the real airplane.
http://i174.photobucket.com/albums/w117/2AF/IMG_4543.jpg


Here are the ring cowls in progress. I simply removed the engines from the cowl flap section and glued the cowls to the flap rings. There is some reshaping of the front of the cowls that I will do on the lathe later.
http://i174.photobucket.com/albums/w117/2AF/IMG_4582.jpg


The o.d. ring is from the first B-17 kit I ever built, just after Monogram released it. I decided to incorporate it just for the sake of nostalgia.

Scott


5006
Warplane Art / Re: Italian P47 remake
« on: March 12, 2010, 07:18:31 AM »
Santynus,

I have to agree with you on the serial color. It appears that both black and white (or very light grey or sky) were used on the Thunderbolt IIs in the Pacific. The airplane restored at Hendon has them in white, but I don't know exactly how accurate the markings are. I still think I have a couple of good photos around here that might be of some help. I'll keep looking. I do have a photo of several razorback Thunderbolt Is in the SE Asia scheme and their serials are black.

Scott

5007
Warplane Art / Re: Italian P47 remake
« on: March 11, 2010, 08:18:57 PM »
I found my old Monogram decal set in the "big box of remains"......
http://i174.photobucket.com/albums/w117/2AF/IMG_4652.jpg


It appears I had an accident with red paint thirty-five or so years ago! :-red No problem though, I'll use the roundels and fin flash and figure out the rest of the markings later.

Scott

5008
Aircraft Modeling / Re: Late war Bf109
« on: March 11, 2010, 07:36:13 PM »
Excellent news on the numerals!

I've been mostly inactive with my modeling hobby for the past few years, but seeing people help each other out with things like this is one of the wonderful aspects of scale modelers.

S

5009
Aircraft Modeling / Re: Late war Bf109
« on: March 11, 2010, 06:48:12 PM »
No.1,

Give me a measurement of the height of the "5" and I'll go through my (very old :-wise) decal collection. I don't know if I have anything there that would help but will be glad to search. I HATE having a model nearly finished but lacking one item.............

Scott

5010
Warplane Art / Re: Italian P47 remake
« on: March 11, 2010, 06:45:21 PM »
All wonderful!!!! In my youth I built the last RAF machine from a 1/48th kit. I still have spare decals in my collection, and I might just have to build another!

Scott

Pages: 1 ... 332 333 [334] 335 336