Show Posts

This section allows you to view all posts made by this member. Note that you can only see posts made in areas you currently have access to.


Messages - Second Air Force

Pages: 1 ... 327 328 [329] 330 331 ... 336
4921
Aircraft Modeling / Re: Boeing Y1B-17 Project--1/48th Scale
« on: November 28, 2010, 03:01:09 PM »
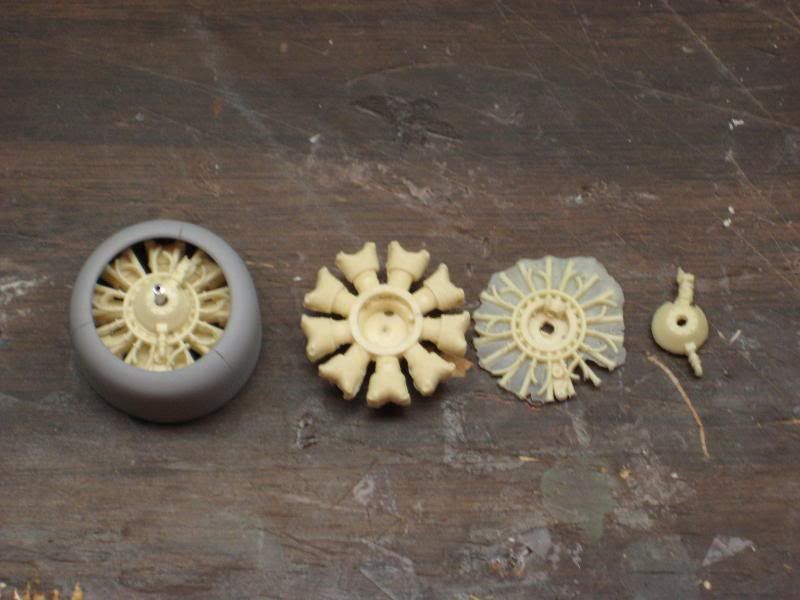
Those engines are "limited run" castings. :-dal I knew I only needed four of them so I didn't spend much time making the molds. There was a bit more flash on the pieces than there should be and it took several attempts to get good copies out of the mold. I was very happy to have been able to find a good master, in this case an Accurate Miniatures SBD-1 kit. The SBD-1 used a R-1820-32 and the YB used a -33, a perfect match!
http://i174.photobucket.com/albums/w117/2AF/IMG_5794.jpg


Scott

4922
Aircraft Modeling / Re: Boeing Y1B-17 Project--1/48th Scale
« on: November 28, 2010, 02:26:08 PM »
As a change of pace I worked on the engines and cowling installations for a time. I had been concerned about how I was going to get the correct gap at the rear of the cowling where it meets the nacelle. On these very early machines there were no cowl flaps, only an aerodynamic opening between the cowl ring and accessory fairings. On the real airplane the engine supports the forward cowling, independent of the rest of the nacelle. This is done by attaching two support rings, one being the aft baffle ring and the other being a plain ring attached to the front of the cylinders. Here is a photo of an engine change on a Y1B-17 from the Amarillo B-17 Mechanic School engine change "classroom". The support ring is easily seen:
http://i174.photobucket.com/albums/w117/2AF/Amarillomock-upEngineInstallation.jpg


I decided to mount the forward ring into the cowling on my model to expedite the process. I used a band of safety wire cut to the right length and made circular, then just inserted it into the cowling so that the engines will be in the correct position. In the final assembly stage I will be able to attach the engines to the firewall and the cowlings will slip onto the engines giving me the gap at the rear of the cowl ring that is needed. In that way you'll be able to see light between the cylinders when looking into the front of the cowling, just like on the real thing:
http://i174.photobucket.com/albums/w117/2AF/IMG_5800.jpg


Now I have to build four airscoops for the oil coolers. I hope I have something in my spares or I'm going to have to scratchbuild them, and I'm not really looking forward to that prospect.

Scott

4923
Aircraft Modeling / Re: Free styles
« on: November 28, 2010, 02:05:59 PM »
Welcome, Goran, and great work!

Scott

4924
Wonderful photos, and thanks for sharing them!

Scott

4925
Aircraft Modeling / Re: Boeing Y1B-17 Project--1/48th Scale
« on: November 26, 2010, 05:14:08 AM »
It's not much yet, but here is the early stage of the tailwheel assembly. I was forced to make a mold of a C-47 tire/wheel assembly and then glue two of them together to get the correct width tire for the B-17. The fork and balance of the strut are aluminum parts.

http://i174.photobucket.com/albums/w117/2AF/IMG_5792.jpg


Scott

4926
Aircraft Modeling / Re: Boeing Y1B-17 Project--1/48th Scale
« on: November 21, 2010, 05:12:56 PM »
Almost like building a real thing... :-think :-clap

I almost think it would be easier to build the real thing sometimes! :)

Scott

4927
Aircraft Modeling / Re: Boeing Y1B-17 Project--1/48th Scale
« on: November 21, 2010, 03:38:35 AM »
This evening I tackled the problem of making the gun blisters. I first got out the calculator and calipers, figured the size of each emplacement in 1/1 and copied No.1's profile view of the lower blister, scaling it to 1/48. Here's some of my math project and the final size of the lower blister:
http://i174.photobucket.com/albums/w117/2AF/IMG_5779.jpg


I then laid the drawing up against the fuselage to get an idea of the dimensions before committing to making parts:
http://i174.photobucket.com/albums/w117/2AF/IMG_5780.jpg


Here is the first mold being made for what will become the male master that'll go in the vacuform machine:
http://i174.photobucket.com/albums/w117/2AF/IMG_5784.jpg


The first male die just after being popped out of the mold. Now I will start the shaping and fitting process, and once I'm happy with the result, I can use this piece of resin to vacuform the clear parts. If I make a mistake, I can always pour as many more pieces as needed to get the four enclosures.
http://i174.photobucket.com/albums/w117/2AF/IMG_5786.jpg


Scott


4928
Warplane Art / Re: Boeing YB17
« on: November 19, 2010, 06:40:26 PM »
My God, Scott you are amasing. :-eek :-ok :-ok :-ok I am unpatient to see further steps.
 :-flo :-wave

I'll make it a point to show you all of my mistakes when I make those blisters!!!!!! It ought to be a pretty ugly process!

I poured a block of resin this morning and I plan to whittle it into the shape required for the master mold. If resin doesn't work I will move on to wood as a second choice. Perhaps balsawood would be a better option than the resin but I have plenty of resin here at home. I reckon I'll post the process and results on the thread in Modeling.

Scott

4929
Warplane Art / Re: Boeing YB17
« on: November 17, 2010, 07:12:38 PM »
Yes, that is the plan. I believe I can easily build a male master. The only difficulty is fitting the fairing to the fuselage and getting it to conform correctly. At this point I think (not certain, though) all four blisters used the same plexiglas and basic framing with the fairings being different for each position. I'd hoped to build one master and then modify the resulting vacuum formed parts as needed. Stay tuned! ;)

Scott

4930
Aircraft Modeling / Re: HOW TO: Natural Metal Finishes
« on: November 17, 2010, 07:00:18 PM »
I made a lot of extra work for myself when I was painting the yellow chromate on the wheelwells and the cockpit green. This was originally going to be an O.D./neutral grey paint scheme but I decided to use it as a NMF practice kit. I've done a lot of sanding to smooth the yellow and green you see sprayed all over. If I'd known I was going to do NMF I would have very carefully masked off the skin so I wouldn't have oversprayed it.

S

4931
Warplane Art / Re: Boeing YB17
« on: November 17, 2010, 06:57:04 PM »
I'll have to vacu-form the blisters. The Koster kit is actually a B-17C/D upgrade with parts to do an E. Also included is a Cheyenne tail turret for later Gs.

Scott

4932
Aircraft Modeling / Re: HOW TO: Natural Metal Finishes
« on: November 17, 2010, 06:15:46 PM »
I dug out the little P-47 I am using for practice with my NMF methods. Most of the surface preparation is done now. Next will be painting the anti-glare panel and dusting a little primer on the various seams to verify that there are no gaps. This Tamiya kit fits so well that almost no filler is necessary.
http://i174.photobucket.com/albums/w117/2AF/IMG_5776.jpg


Scott

4933
Aircraft Modeling / Re: Boeing Y1B-17 Project--1/48th Scale
« on: November 17, 2010, 06:12:39 PM »
Very quick update--a couple of pictures of the waist and ventral gun openings. Next will be making the die for vacuforming the actual blisters.

http://i174.photobucket.com/albums/w117/2AF/IMG_5774.jpg


http://i174.photobucket.com/albums/w117/2AF/IMG_5775.jpg


Scott

4934
Warplane Art / Re: Boeing YB17
« on: November 17, 2010, 06:10:32 PM »
Now all I need to do is make the blisters! :-roll

http://i174.photobucket.com/albums/w117/2AF/IMG_5774.jpg

4935
Warplane Art / Re: Boeing YB17
« on: November 16, 2010, 06:16:42 PM »
I happen to be working on the blisters for the 1/48th model so I'm going to shamelessly "borrow" your profile for reference.  Good work!

Scott

Pages: 1 ... 327 328 [329] 330 331 ... 336