Author Topic: G.A.C. Hotspur  (Read 14874 times)

Offline Ernie

  • Beginner
  • *
  • Posts: 371
    • View Profile
G.A.C. Hotspur
« on: November 13, 2011, 02:03:40 PM »
Since this is my first build here, I though I would start with something rather simple so as to not embarrass myself too badly if it goes wrong :)!

This is the old Frog / Novo kit of the Hotspur glider. The Hotspur was designed as a light assult glider which could hold 8 troops. It was soon deemed impractical as it was recognized that landing so few troops per glider was less than ideal, and so the Hotspur was used as a training aircraft for future Horsa and Hamilcar glider pilots.

This is a plane I have wanted to model for some time and a friend of mine had the kit in his collection and was kind enough to give it to me to build. This is a Russian molding of the kit obtained many years ago in a bag, no decals are included. It is interesting to not that the surface of the plastic is very greasy, almost like a wax on the plastic, I have not noticed this with later examples of the kit released by Eastern Express for example. Though on this kit while there is allot of flash around some of the parts, the fit seems to be better than some later moldings of this kit.

My intention for this build is to add some detail to the cockpit, and since it has been awhile since I have finished anything, to finish it :) I am also using it as a pratice piece for re-scribing the few panel lines there are in anticipation of other projects that will require allot more re-scribing.

http://i72.photobucket.com/albums/i179/captianplastic/Decorated%20images/hotspur/013.jpg
G.A.C. Hotspur

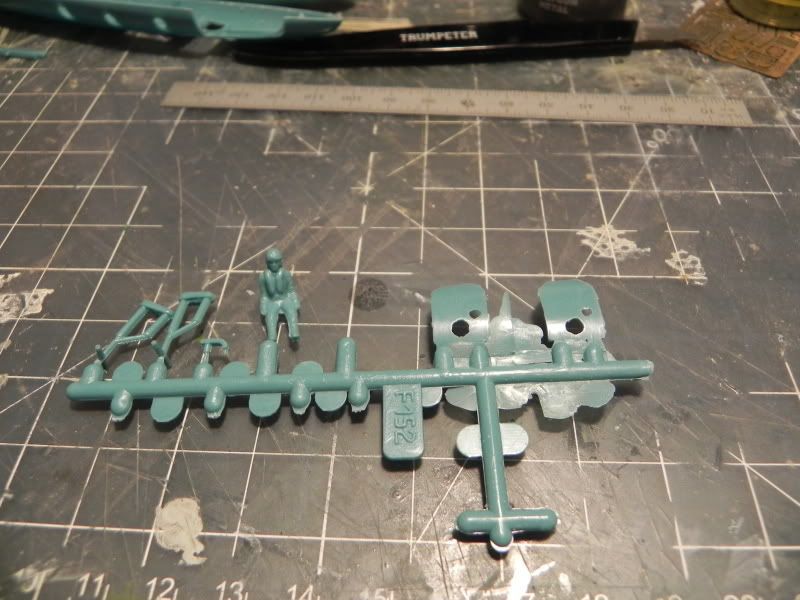
As you can see there is alot of flash around the parts, nice blue color too!

http://i72.photobucket.com/albums/i179/captianplastic/Decorated%20images/hotspur/014.jpg
G.A.C. Hotspur

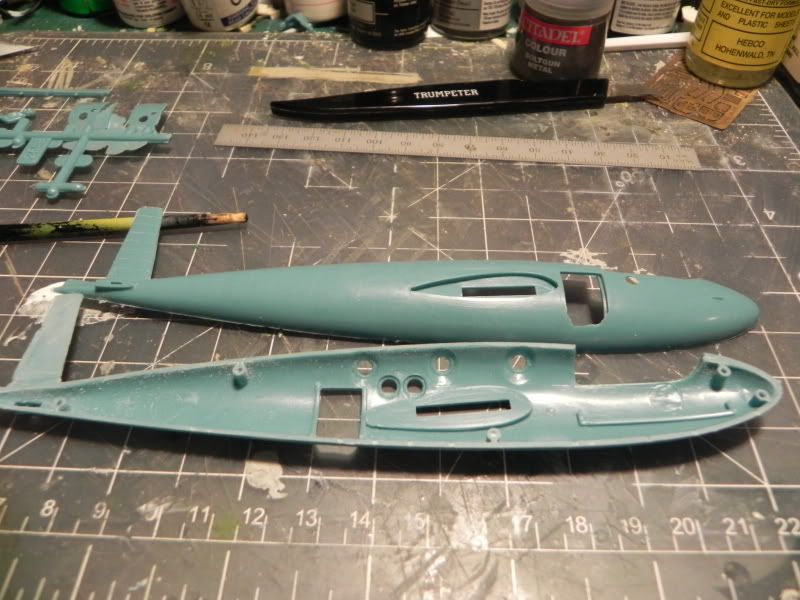
The cockpit area, not much there! There are a couple of ejector pin marks on the side walls, they are not too deep and can be easily sanded out.

http://i72.photobucket.com/albums/i179/captianplastic/Decorated%20images/hotspur/012.jpg
G.A.C. Hotspur

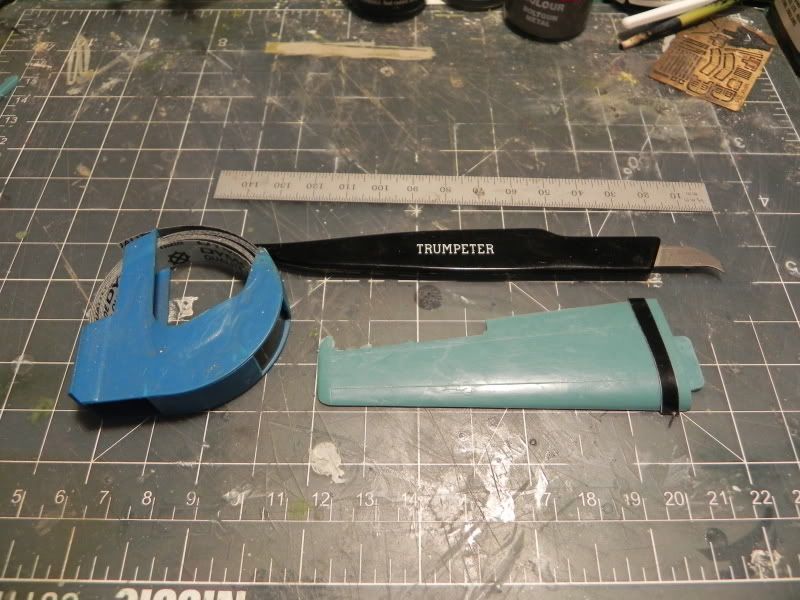
Re-scribing the wings, I use a Trumpeter scribing tool and it works well for me. To guide the the scribing tool I use a small metal straight edge and Dymo tape for the curved areas.
Ernie

Offline Nico Braas

  • Jr. Member
  • **
  • Posts: 959
    • View Profile
Re: G.A.C. Hotspur
« Reply #1 on: November 13, 2011, 02:19:40 PM »
Hope that these images will give you some guidence!
And if you find another kit you can make a Twin Hotspur!!!

Offline Sall

  • Sr. Member
  • ****
  • Posts: 4641
  • Build what YOU want,the way YOU want to,and above all-have fun!
    • View Profile
Re: G.A.C. Hotspur
« Reply #2 on: November 13, 2011, 02:33:57 PM »
Nice Ernie! :-flo
I also use Trumpeter scriber, and also work well in my case. I have to practice more with it,but... Everything is school! :)

Offline No.1

  • Administrator and Owner
  • Administrator
  • Hero Member
  • *****
  • Posts: 23093
  • Owner: www.letletlet-warplanes.com
    • View Profile
    • LetLetLet - Warplanes
Re: G.A.C. Hotspur
« Reply #3 on: November 13, 2011, 02:49:52 PM »
This is great choice for your very first start here as well I gliders are rare here on forum. I know the points about molds- this is Novo :)) Nice images Nico :-ok

Offline Ernie

  • Beginner
  • *
  • Posts: 371
    • View Profile
Re: G.A.C. Hotspur
« Reply #4 on: November 13, 2011, 02:58:01 PM »
Nico, Thank you so much for those pictures! They have answered one of my questions reguarding the location of the porthole near the cockpit. Frog have it located in the cockpit area, so I will have to move aft a bit. You don't by chance have any info on the cockpit layout do you?
The twin Hotspur is cool too, maybe some day I will do one of those, but I have not seen may of these kits around lately, so I am just happy to have the chance to build this one! Again, thank you for the pics.
Ernie

Offline Second Air Force

  • Moderator
  • Hero Member
  • *****
  • Posts: 5775
    • View Profile
Re: G.A.C. Hotspur
« Reply #5 on: November 13, 2011, 04:25:07 PM »
Boy, this brings back memories of my youth! I built one of these but not a single bit survives today, so this will be enjoyable to watch.

Offline Ernie

  • Beginner
  • *
  • Posts: 371
    • View Profile
Re: G.A.C. Hotspur
« Reply #6 on: November 18, 2011, 05:14:27 AM »
A bit more progress, the wings have been rescribed and the doors added to the fuselage. I knew the fit of the doors was going to be poor, and since they were going to scribed in I wanted to to to avoid using putty if possible. The doors were cemented into place slightly raised above the surface of the fuselage. The gaps around the door were filled with gap filling superglue, when that was dried, the whole area was sanded down to match the fuselage surface, and then the door outlines were scribed in. It has taken a couple of repeats to get the scribed lines how I wanted them as scribing over the plastic and superglue caused the lined to be inconsistent. But, I am in no big hurry, I would rather have things come out right.

http://i72.photobucket.com/albums/i179/captianplastic/Decorated%20images/hotspur/011.jpg
G.A.C. Hotspur


This is one of the doors glued into place and covered with superglue, before being sanded back. I should have more photos of the progress so far in a little while.
Ernie

Offline No.1

  • Administrator and Owner
  • Administrator
  • Hero Member
  • *****
  • Posts: 23093
  • Owner: www.letletlet-warplanes.com
    • View Profile
    • LetLetLet - Warplanes
Re: G.A.C. Hotspur
« Reply #7 on: November 18, 2011, 06:55:21 AM »
Problem with super glue is that it is harden then plastic around so there could be some problem in sanding. Hope you will complete this in smooth finish :)

Offline Sall

  • Sr. Member
  • ****
  • Posts: 4641
  • Build what YOU want,the way YOU want to,and above all-have fun!
    • View Profile
Re: G.A.C. Hotspur
« Reply #8 on: November 18, 2011, 11:07:05 AM »
Quote
I should have more photos of the progress so far in a little while.
Yes, maybe you could put images of that area after sanded. ;)

Offline Ernie

  • Beginner
  • *
  • Posts: 371
    • View Profile
Re: G.A.C. Hotspur
« Reply #9 on: November 18, 2011, 02:05:17 PM »
Quote
I should have more photos of the progress so far in a little while.
Yes, maybe you could put images of that area after sanded. ;)

Definitely Sall, it is much improved over that picture, I was just trying to show what I was starting with in that area to get the door to fit and blend into the rest of the fuselage.
Ernie

Offline Sall

  • Sr. Member
  • ****
  • Posts: 4641
  • Build what YOU want,the way YOU want to,and above all-have fun!
    • View Profile
Re: G.A.C. Hotspur
« Reply #10 on: November 18, 2011, 02:15:51 PM »
All right. ;) Waiting for pics of sanded area. No doubt you will do nice job. ;)

Offline draken35

  • Hero Member
  • *****
  • Posts: 8724
    • View Profile
Re: G.A.C. Hotspur
« Reply #11 on: November 18, 2011, 07:18:20 PM »
Interresting build...