Author Topic: Eduard Bf-109E 1/48  (Read 48333 times)

Offline No.1

  • Administrator and Owner
  • Administrator
  • Hero Member
  • *****
  • Posts: 23093
  • Owner: www.letletlet-warplanes.com
    • View Profile
    • LetLetLet - Warplanes
Re: Eduard Bf-109E 1/48
« Reply #15 on: July 24, 2012, 01:15:29 PM »
I also prefer streamlined shapes :)

Offline Second Air Force

  • Moderator
  • Hero Member
  • *****
  • Posts: 5775
    • View Profile
Re: Eduard Bf-109E 1/48
« Reply #16 on: July 24, 2012, 01:37:24 PM »
Yes, it fits my display case better if I leave each airplane in one piece. I don't have space for individual display bases for each machine and I know from experience that I'll lose parts if they aren't glued on! Also, I wanted to build this review kit with cowling installed so we can view it next to the competition for visual comparison.

Offline Sall

  • Sr. Member
  • ****
  • Posts: 4641
  • Build what YOU want,the way YOU want to,and above all-have fun!
    • View Profile
Re: Eduard Bf-109E 1/48
« Reply #17 on: July 24, 2012, 03:35:57 PM »
Great progress Scott!! :-ok :-clap

Offline No.1

  • Administrator and Owner
  • Administrator
  • Hero Member
  • *****
  • Posts: 23093
  • Owner: www.letletlet-warplanes.com
    • View Profile
    • LetLetLet - Warplanes
Re: Eduard Bf-109E 1/48
« Reply #18 on: July 24, 2012, 11:07:00 PM »

Offline Second Air Force

  • Moderator
  • Hero Member
  • *****
  • Posts: 5775
    • View Profile
Re: Eduard Bf-109E 1/48
« Reply #19 on: July 25, 2012, 04:28:52 AM »
That panel is beautiful, No.1.

Here is some progress on one of the other models from the Royal Class kit:

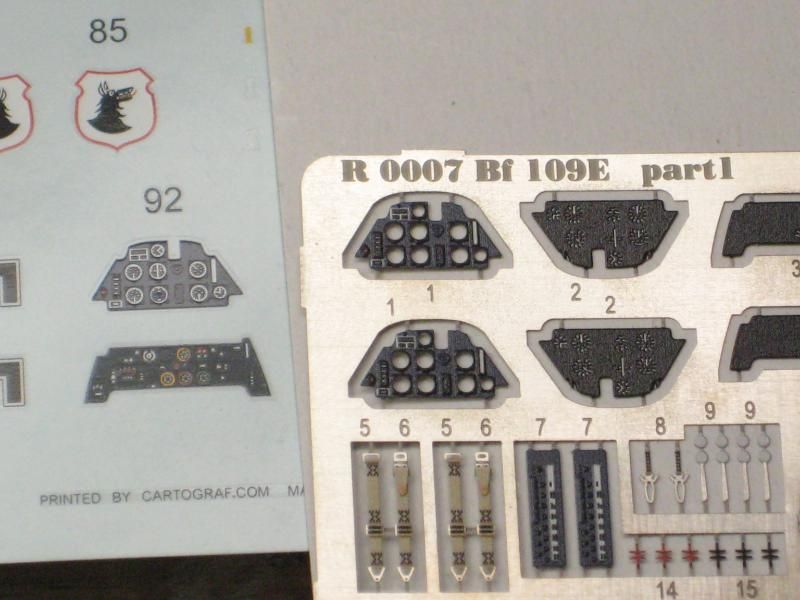
Buildup of the cockpit started with the instrument panel. For this item Eduard gives three options in the Royal Class kit; decal with flat panel in styrene, styrene parts with raised instrument bezels, and photoetch. This is a photo of the decals and PE parts side-by-side:
http://i174.photobucket.com/albums/w117/2AF/IMG_0440.jpg
Eduard Bf-109E 1/48


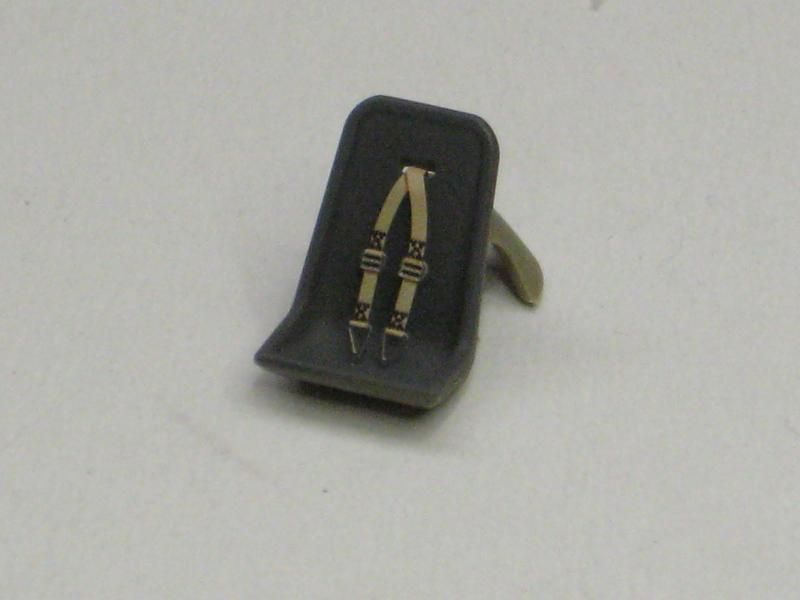
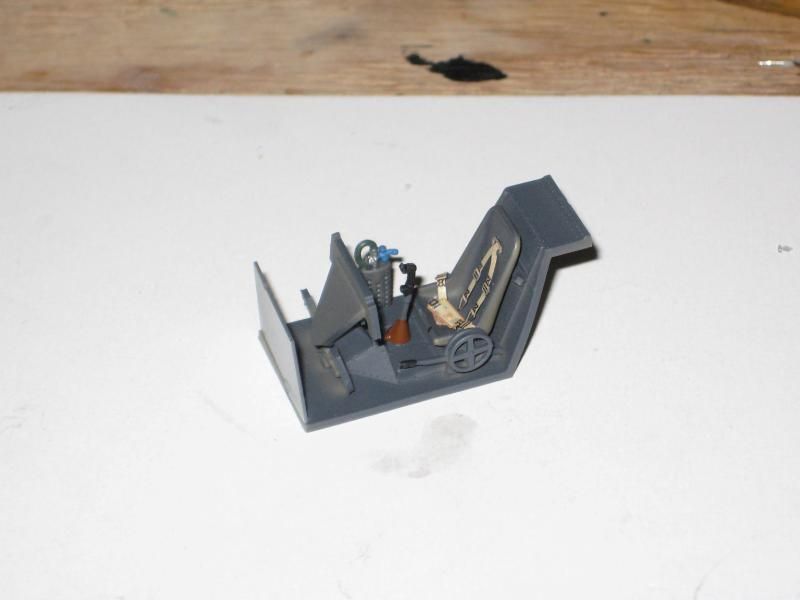
Next was to assemble the etched seatbelt harnesses to the seat, then building up the balance of the cockpit floor and bulkheads:
http://i174.photobucket.com/albums/w117/2AF/IMG_0446.jpg
Eduard Bf-109E 1/48

http://i174.photobucket.com/albums/w117/2AF/IMG_0449.jpg
Eduard Bf-109E 1/48


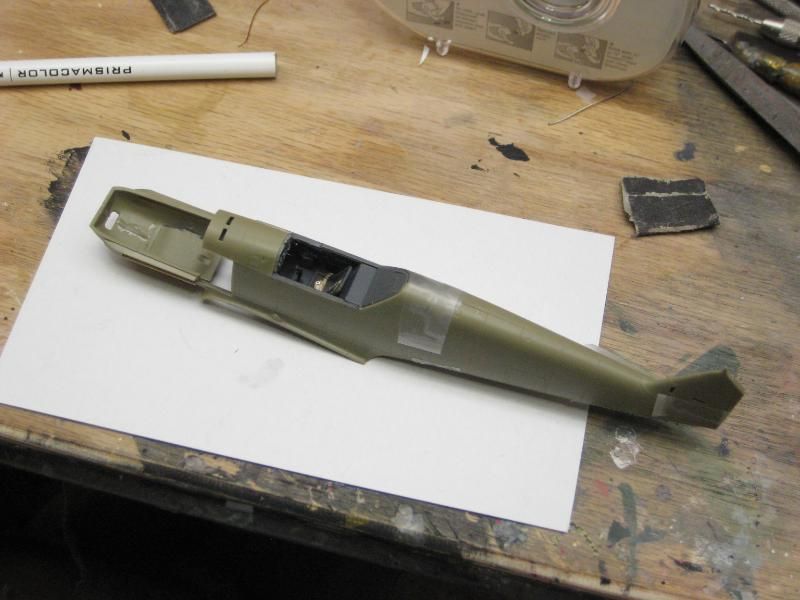
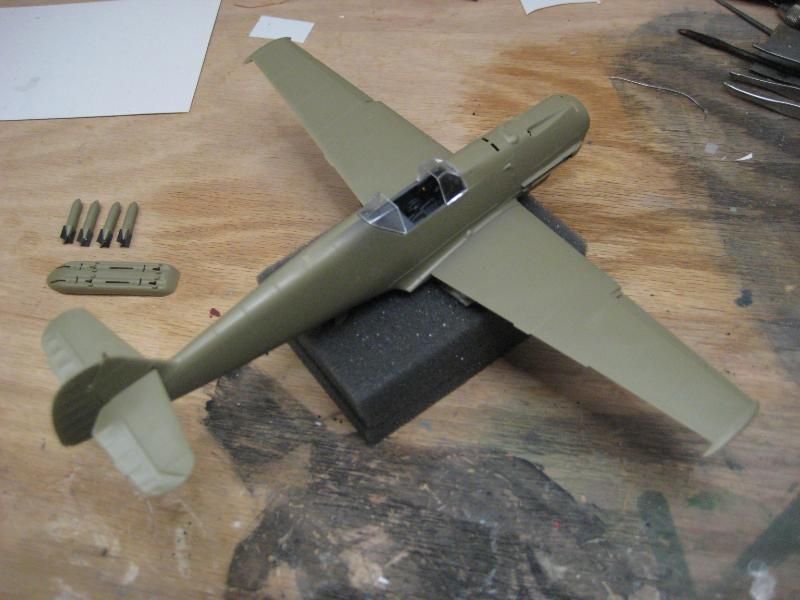
After assembly of the cockpit it was a simple matter to glue the fuselage halves together, then install the wing.
http://i174.photobucket.com/albums/w117/2AF/IMG_0450.jpg
Eduard Bf-109E 1/48

http://i174.photobucket.com/albums/w117/2AF/IMG_0451.jpg
Eduard Bf-109E 1/48


The fit of this kit is absolutely flawless. I don't see any but the smallest areas (around the oil cooler inlet and lower forward cowl) that will require any filler at all. I was somewhat skeptical of how the upper cowl and side panels would all mesh together, but my concern was without merit. Everything fits perfectly!

Offline No.1

  • Administrator and Owner
  • Administrator
  • Hero Member
  • *****
  • Posts: 23093
  • Owner: www.letletlet-warplanes.com
    • View Profile
    • LetLetLet - Warplanes
Re: Eduard Bf-109E 1/48
« Reply #20 on: July 25, 2012, 06:28:57 AM »
I am glad that you enjoy in this build mate :-clap :-ok

Offline Sall

  • Sr. Member
  • ****
  • Posts: 4641
  • Build what YOU want,the way YOU want to,and above all-have fun!
    • View Profile
Re: Eduard Bf-109E 1/48
« Reply #21 on: July 25, 2012, 01:02:37 PM »
Good! :-clap

Offline Second Air Force

  • Moderator
  • Hero Member
  • *****
  • Posts: 5775
    • View Profile
Re: Eduard Bf-109E 1/48
« Reply #22 on: July 27, 2012, 03:23:44 AM »
Only the tiniest bit of filler on this one, as I mentioned earlier. Just a spot of primer to double check the seams and it's ready for further painting.
http://i174.photobucket.com/albums/w117/2AF/IMG_0457.jpg
Eduard Bf-109E 1/48


And here's the kind of problem we modelers really enjoy. The Eduard Royal Class kit offers two wheel/tire options--the styrene kit parts or their Brassin wheel set. The photo shows unbuilt Brassin wheels at top. The spokes and hub are simply removed from the resin block and fitted to the wheel face. This gives you the correct open area between the spokes and the hub face as on the real thing. The built-up Brassin wheel is just below the unbuilt wheels and the plastic kit wheel is at bottom. The styrene parts in the kit consist of the tire and inner and outer wheel halves. This buildup also has the spokes separated from the wheel face.
http://i174.photobucket.com/albums/w117/2AF/IMG_0465.jpg
Eduard Bf-109E 1/48

Offline No.1

  • Administrator and Owner
  • Administrator
  • Hero Member
  • *****
  • Posts: 23093
  • Owner: www.letletlet-warplanes.com
    • View Profile
    • LetLetLet - Warplanes
Re: Eduard Bf-109E 1/48
« Reply #23 on: July 27, 2012, 06:49:21 AM »
At least you have now spares for another kit (if it have inaccurate wheels). Next week will send you resin engine kit, it is review sample and hope you can manage to include it in another kit ;)

Offline draken35

  • Hero Member
  • *****
  • Posts: 8724
    • View Profile
Re: Eduard Bf-109E 1/48
« Reply #24 on: July 27, 2012, 08:32:59 AM »
:-ok

Offline Second Air Force

  • Moderator
  • Hero Member
  • *****
  • Posts: 5775
    • View Profile
Re: Eduard Bf-109E 1/48
« Reply #25 on: July 27, 2012, 12:22:56 PM »
I should mention that the tailwheel in the Brassin kit is also very impressive. So is the tailwheel on the styrene trees! Either option is very nice so whichever ends up in the spares box will be an improvement on another project.

I am formulating a plan for the review engine....... :-think

Offline Sall

  • Sr. Member
  • ****
  • Posts: 4641
  • Build what YOU want,the way YOU want to,and above all-have fun!
    • View Profile
Re: Eduard Bf-109E 1/48
« Reply #26 on: July 27, 2012, 12:36:16 PM »
 :-ok

Offline No.1

  • Administrator and Owner
  • Administrator
  • Hero Member
  • *****
  • Posts: 23093
  • Owner: www.letletlet-warplanes.com
    • View Profile
    • LetLetLet - Warplanes
Re: Eduard Bf-109E 1/48
« Reply #27 on: July 27, 2012, 01:14:49 PM »
Engine... I have basic image of box, you build it and this will be used in article (as direct link to your built). Are you going to put it in plastic kit is on you (but in general it demand to put it in)

:)

Offline Second Air Force

  • Moderator
  • Hero Member
  • *****
  • Posts: 5775
    • View Profile
Re: Eduard Bf-109E 1/48
« Reply #28 on: July 28, 2012, 12:03:08 AM »
Hmmm......I have a very interesting idea.......

Offline Second Air Force

  • Moderator
  • Hero Member
  • *****
  • Posts: 5775
    • View Profile
Re: Eduard Bf-109E 1/48
« Reply #29 on: July 29, 2012, 05:14:13 AM »
Painting day, first the Theatre markings:
http://i174.photobucket.com/albums/w117/2AF/IMG_0467.jpg
Eduard Bf-109E 1/48


Then masking canopy parts. I totally forgot to mention earlier that the Royal Class Bf-109E has four complete sets of canopy masks, one being applied in this photo.
http://i174.photobucket.com/albums/w117/2AF/IMG_0468.jpg
Eduard Bf-109E 1/48


Next a bit of preshading along with a G10. This is only the second time I've tried this method and I'm really starting to enjoy the effect. After the black strips are sprayed the undercolor is applied. You can see the G has a bit more of the staining effect than the E--this was a slight miscalculation on my part, the RLM 65 covers better than the 76 does for some reason. No problem, though, further weathering of the Emil can be done later.
http://i174.photobucket.com/albums/w117/2AF/IMG_0469.jpg
Eduard Bf-109E 1/48

http://i174.photobucket.com/albums/w117/2AF/IMG_0470.jpg
Eduard Bf-109E 1/48